Quantcast
Channel: BogDan Vatra, Author at KDAB
Viewing all 27 articles
Browse latest View live

Qt on Android Episode 1

$
0
0

I’d like to start a new series of blog posts focused on Qt on Android.

The first article is about how it began, how it works, the current status, what to expect from 5.2 and what are my plans for 5.3. In the next article I’ll focus on development setup for Android.

Let’s get started:

How did it begin?

In June 2009 I joined ROUTE 66 as a senior Linux developer. My first task was to port the navigation engine on Android. Back then Google hadn’t yet released any NDK officially, so I had to create one of my own from Android sources. 

Shortly after, I managed to have a working engine running on Android. I began to love Android but something was missing, something that I cared a lot about. That something was Qt, my favorite framework. That was what was missing! And I said to myself that I had to do something about it.

In October 2009 Nokia (yep, Qt was owned by Nokia back then, what days …) announced the Lighthouse project. The Lighthouse project was created to allow developers to easily port Qt to (almost) any platform.

In late December 2009 (I think it was after Christmas) I had enough free time to begin the port. I also chose to use the Lighthouse project even if it was a very young research project. As far as I know my Android port was the first port that used Lighthouse. Just after a month (in January 2010), I saw the first graphics rendered by Qt on my phone. The feeling was fantastic!

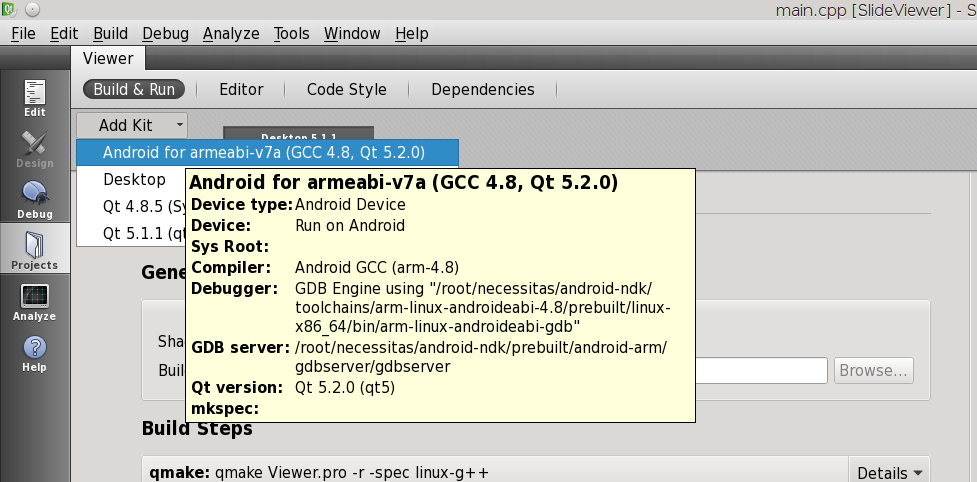
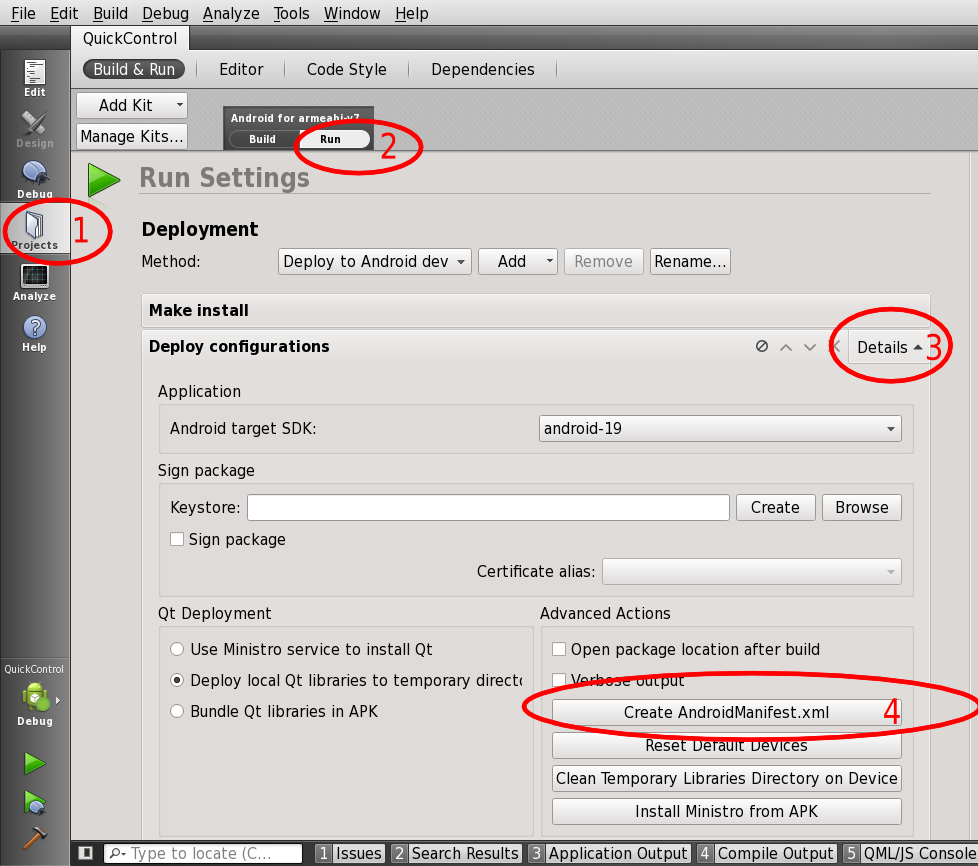
A few months later, after Qt was in a good shape, I began the work on a Qt Creator plugin and on Ministro. The Qt Creator plugin enables the user to manage, develop, deploy, run & debug Qt applications on Android Devices/Emulator very easily.

Even if almost everything was in place, still not too many people wanted to use it because they had to compile everything manually. Then I decided to do something about it.

So, in 2011, a few weeks after Nokia announced their big strategy shift, I announced the first usable SDK for Android. This is how the Necessitas project began and after it become a huge success, I decided to join KDE and to continue the project under the KDE umbrella. Why KDE? Well, because we share the same goal: to keep Qt powerful and free for everyone. Also I could use their fantastic infrastructure to distribute Qt libs.

The very first SDK release was Linux only. Soon Ray Donnelly contacted me and ported the SDK to Windows and Mac. If you are using Necessitas (and Qt5 Android SDK) on any of these platforms, he is the guy you have to thank!

Together with Ray and other people, we’ve managed to do more and more releases of the Necessitas SDK.

Because the Qt Creator plugin was an immense success, I upstreamed the plugin in 2012, when Qt was still owned by Nokia!

In November 2012, I contributed the Android port to Qt Project for Qt 5 integration. Here I’d like to make some clarifications: ONLY Qt 5 is developed under the Qt Project umbrella. Qt 4 is still owned by KDE as Necessitas project.

Let’s see how Qt on Android broadly works. I’m not going to go way too deep in details but enough for you to have an idea how it works.

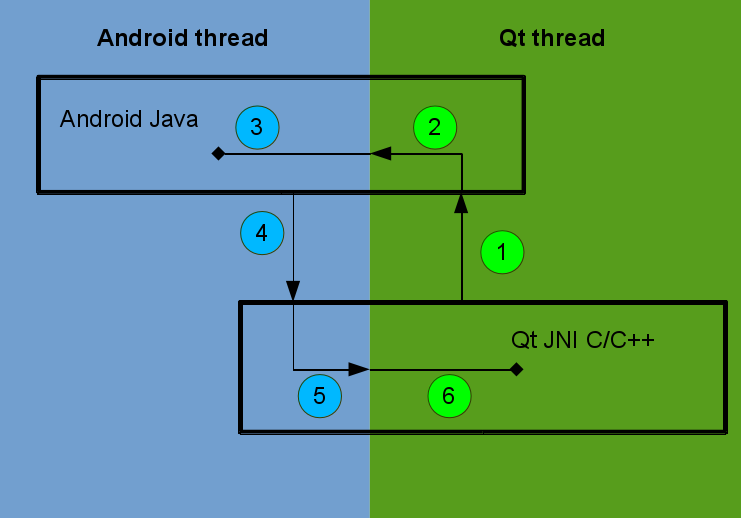
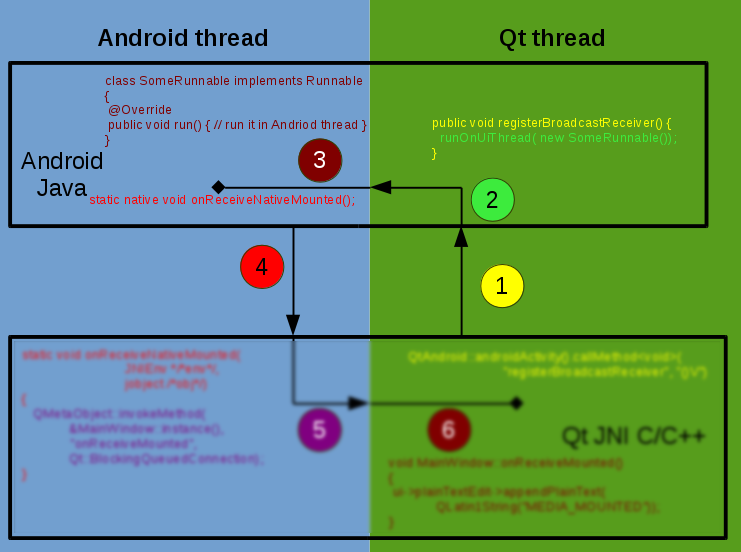
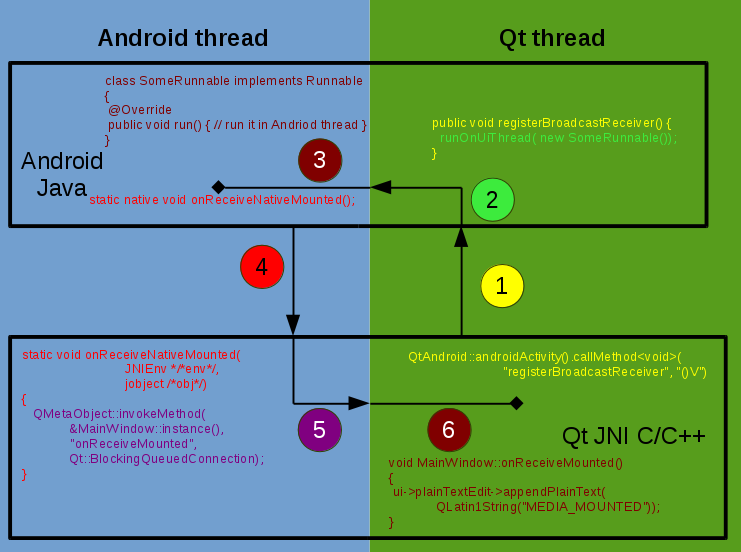
As I wrote previously, the port is based on the Lighthouse project. Lighthouse (now re-branded as QPA) is the platform abstraction layer for Qt. Basically this layer sits between Qt and the platform, making the porting pretty easy. Because Android applications are written in Java, and it is impossible to connect the Qt event loop to Android’s event loop, I had to move the Qt main event loop to another thread. If you want to extend your application keep in mind the fact that the Qt event loop and Java UI are running on different threads. Even after Google added the NativeActivity, it was impossible to use it, mostly because it didn’t expose all the features we need in Qt.

A Qt for Android application consists of two big parts:

  • The native part, containing one or more .so files, which are actually your Qt application. If you choose to bundle Qt libraries, it will contain also these libs.
  • Android specific part. This part contains the followings sub-parts:
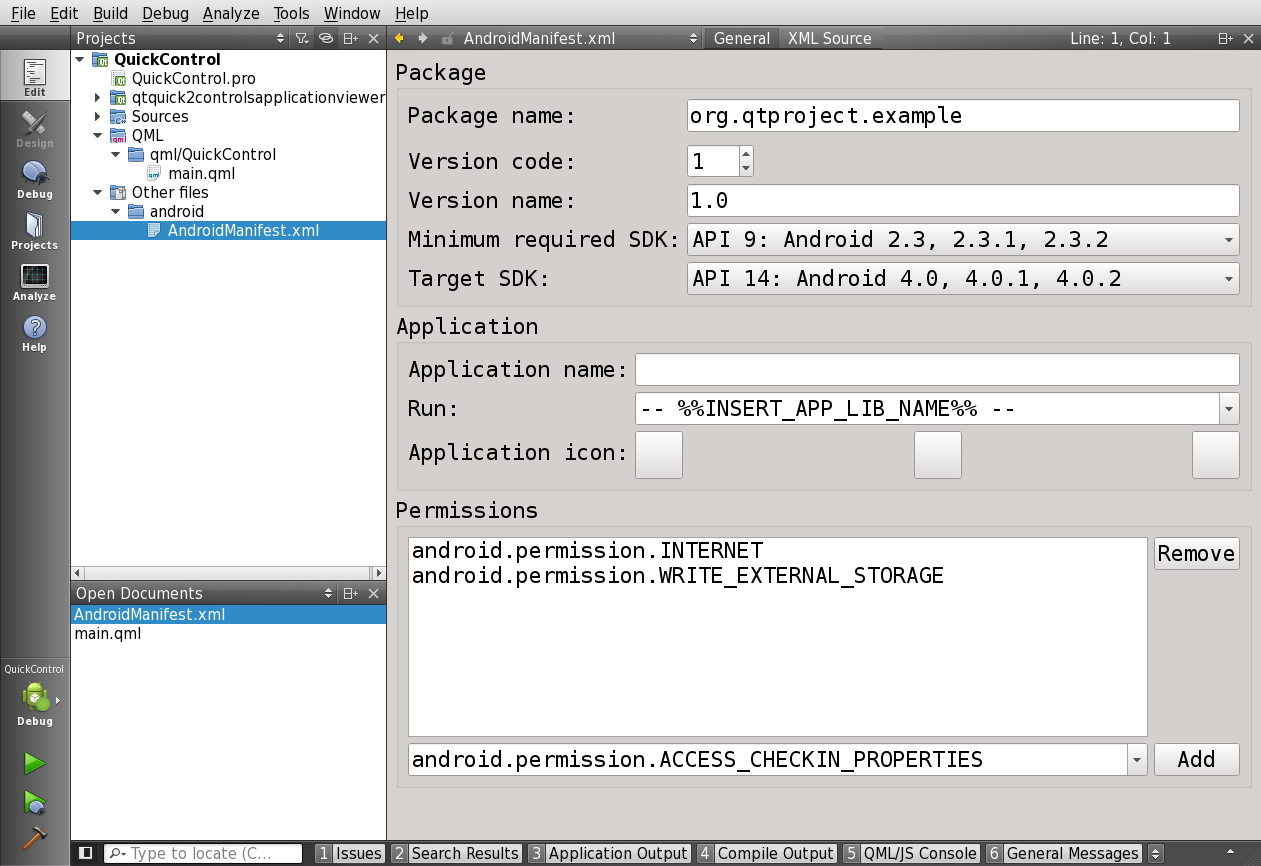
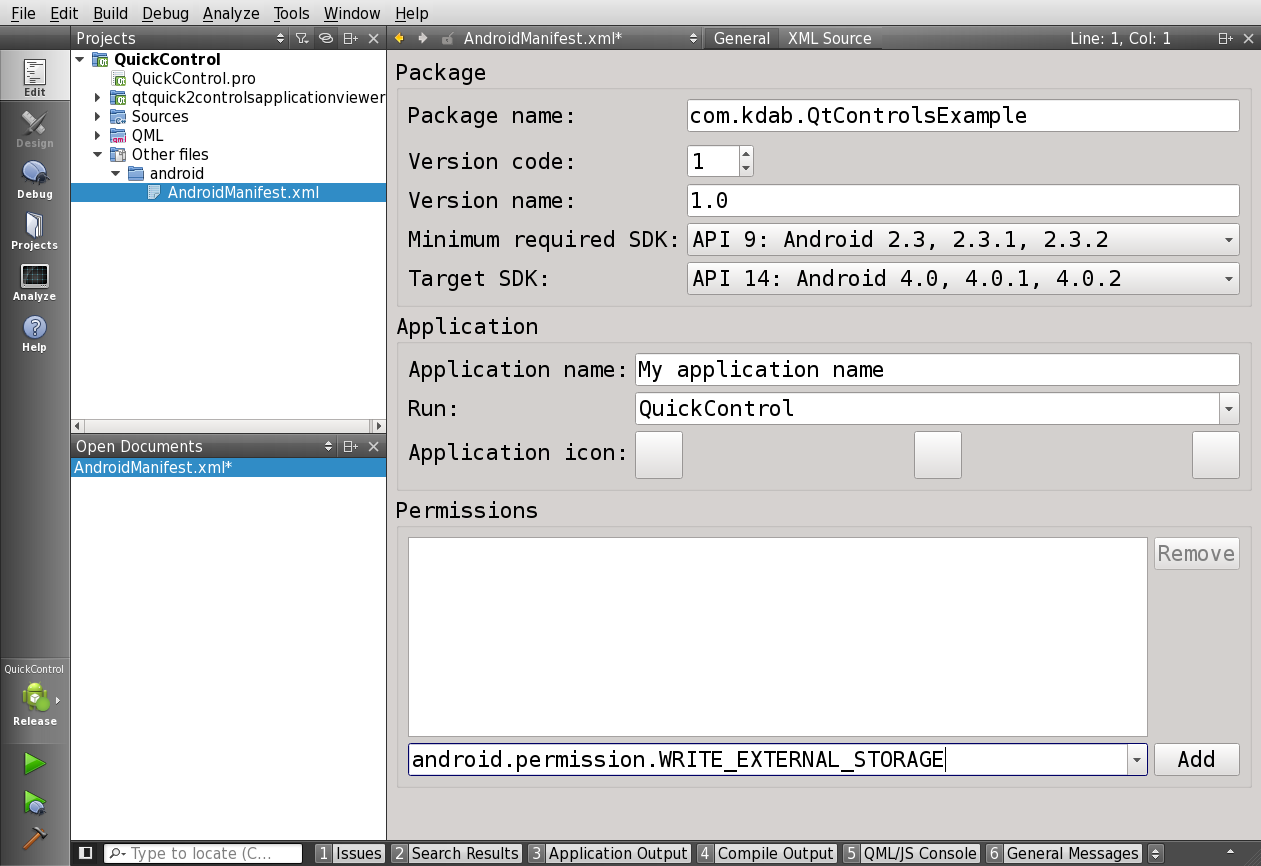
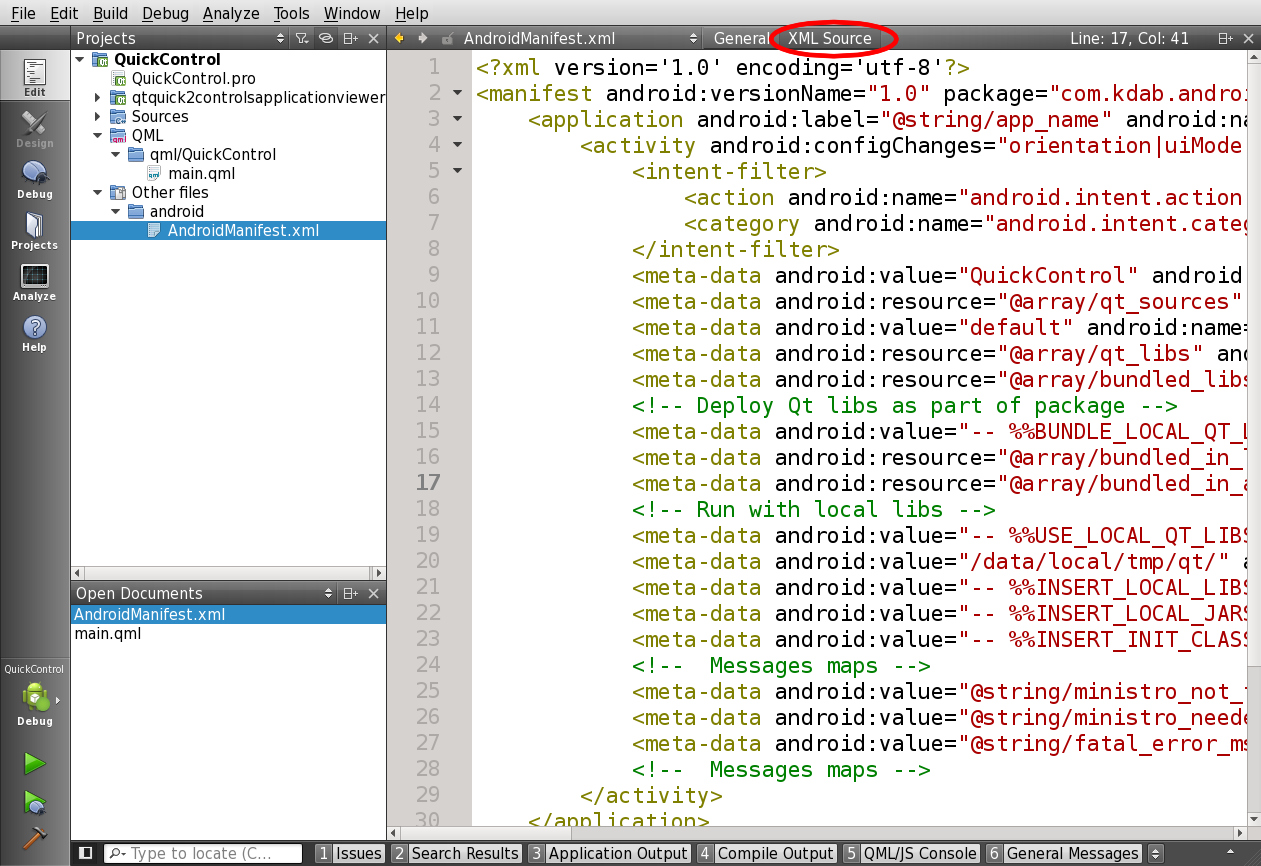
    • Android manifest. This is the entry point of your application. Android uses this file to decide which Application/Activity to start, it contains the application permissions, declares the minimum of the Android API that application needs, etc.
    • Two Java classes which load the dependencies and your application. They are also a part of the Java bridge between Qt QPA and the Android world.
    • Ministro service .aidl files. These are two interfaces used to communicate with Ministro service. Ministro service is one of the deployment solutions (will write more about that later).
    • OIther resources, e.g. assets, strings, images, etc.

All these parts are bundled in a single package which represents your final application. Now lets see how those parts works together.

When your application starts, Android uses the manifest file to run an activity. This activity (which is a custom activity) is a small part of the magic in the Java world of your application. To be able to update Qt libs without breaking the existing application, the Java part is split in two: a very small part which ships together with your application (a part of it) and another part (a Java library, a .jar file) which contains all the logic for the QPA plugin.

The first Java part that is shipped with your application is responsible for finding the missing libs (Qt and Java) and to load them. It also forwards all the events (touch, application states changes, screen changes, etc.) to the second Java part.

The second Java part is responsible for communicating with Qt. It contains all the logic needed by the Android QPA plugin, e.g. the creation and management of the drawing surface, virtual keyboard handling, and so on.

So, the (first) Java part finds and loads all the missing libs and your application and it forwards all the events to the second part, but how does your “main” method get called? Well, the QPA plugin does that. No, I’m not insane! And yes the QPA plugin is loaded before your application starts (actually is loaded even before your application is loaded :) ).

Ok, let me try and explain why I had to come to such a crazy design.

My dream was to find a way so that the developers could just compile their existing Qt applications for Android, so I had to find a way to call the “main” method (I didn’t want to force you to create other main entry methods for your application, similar to the “WinMain” thing :) ). 

The problem is that in order to call a method from Java, someone has to register that method first, otherwise you can’t call it, here the QPA comes in the scene. After the QPA plugin is loaded, it registers a few native function which are used by the Java part to make calls in the native world. After the Java part finishes to load all the libs and your application, it just calls “startQtApplication“ native method which was registered by the QPA plugin earlier. This method searches for “main” method symbol, creates another thread and runs the “main” method from within that thread. It must create another thread because calling “main” method blocks the caller until it exists and we must keep the Android UI thread free to allow the Android event loop to run.

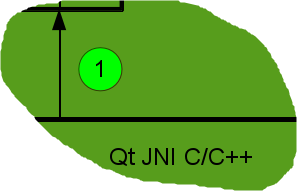
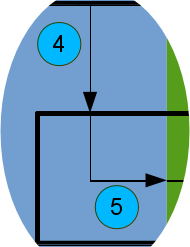
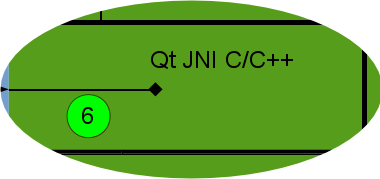
In a later article, I will cover how to use JNI to do calls from/to Java to/from native (C/C++) world.

Finally, have a look at the current status of Qt on Android, what you’ll get in Qt 5.2 and what are the plans for Qt 5.3 for Android.

 Qt Essentials status:

Module

Qt 5.1

Qt 5.2

Qt 5.3

Qt Core

missing system semaphores and shared memory

shared memory is on my TODO list

Qt Multimedia

video and audio works, missing camera support

brings camera support

ATM no other plans

Qt Network

missing SSL support

brings SSL support

ATM no other plans

Qt Quick Controls

missing android native style

brings android native style

ATM no other plans

Qt Quick Controls (erratum)

missing android native style

missing android native style

on my TODO list

Qt SQL

only sqlite is provided by Qt-Project SDK

Qt WebKit & Qt WebKitWidgets, Qt WebEngine

missing

There is hope for Qt WebEngine

Qt Widgets

missing android native style

brings android native style

ATM no other plans

Qt GUI, QML, Quick,Quick Layouts, Test

just works


Qt Add-Ons status:

Module

Qt 5.1

Qt 5.2

Qt 5.3

Qt Android Extras

missing

additional functionality for development on Android

android services/binder support is on my TODO list

Qt Bluetooth

missing

on my TODO list

Qt NFC

missing

on my TODO list

Qt Positioning

missing

on my TODO list

Qt D-Bus

missing, android uses the binder IPC.

Missing, but as I said Qt will have something similar for Android

Qt Sensors

commonly used sensors

more sensors added

ATM no other plans

Qt PrintSupport

missing, no native print support on Android

Qt OpenGL

limited to one top level widget, can’t mix QGLWidget with other QWidget(s)

there is hope to use one more top level widget

can mix a single QGLWidget with other QWidgets

Qt SerialPort

missing

support added

ATM no other plans

Qt Concurrent, Declarative, GraphicalEffects, ImageFormats, Script, ScriptTools, SVG, XML, XMLPatterns


just works

Thank you for your time.

See you next time when we’ll discuss how to setup the development for Android.

Update: Qt on Android Episode 2 is available here


Qt on Android Episode 2

$
0
0


In this article we’ll move forward and see how to set up the development environment for Android.

A few remarks before we start:

  • This article focuses on Qt 5.2! I’ll add comments for 5.1 though.
  • Even you can use Windows and Mac OSX to develop Android Qt apps, for a painless experience I do recommend GNU/Linux. For the rest of the article I’ll refer only to GNU/Linux. Mac OSX setup should be pretty close to GNU/Linux.

Now, let’s get started:

Pre-Requirements:

  • a GNU/Linux box :)
  • ant
  • (open)JDK 6+. If you are using 5.1 and Qt Creator 2.8 make sure you are using (open)JDK 6 and not 7!

On a debian based distribution the following command does the job:

sudo apt-get install ant openjdk-6-jdk

Install:

Next step is to download and install the Qt Project SDK. If you are reading this article *before* Qt 5.2 is released and you want to use Qt 5.2 then you have to download a copy from here http://download.qt-project.org/snapshots/qt/5.2/. Otherwise if Qt 5.2 is released or you want to use Qt 5.1 then you should use http://qt-project.org/download to download one.
If you choose an offline installer, don’t forget to choose one which contains Android in its name. If you prefer the online installer, make sure you check the Android component(s).

Qt Project’s SDK is not coming with Android SDK/NDK so you must download and install them yourself from http://developer.android.com/sdk/index.html. You’ll need Android NDK (ver. r9+) and SDK (ver. 22+).

If you don’t plan to create Android Java apps, then make sure you are downloading ONLY the SDK and not ADT Bundle or Android Studio, check the following image:

SDK

Setup:

After you download and extract them, you have to install at least Android API-13! No, I don’t (and never did) smoke crack, and yes, I know you want to target lower API’s! Short version is: just do it :) , you’ll still be able to target Android devices starting with API-9! Longer version is in the next article where I’ll give you a detailed explanation on this matter.

So, to install an Android API SDK you need to run:

android-sdk/tools/android

tool and choose Android API-13 SDK Platform. You also must install Android SDK Platform-tools and Android SDK Build-tools. You can choose extra Android APIs if you are planning to extend your application using JNI and you target a specific API version. For the moment Android API-13 SDK is enough. If you are superstitious and you are afraid of the beautiful prime number 13 you can choose any greater version :) .

The next image shows you what I chose:

SDK1

If you are using a real device on GNU/Linux, you have to set the USB permissions. Please check Android http://developer.android.com/tools/device.html or your distribution site on this matter.

In order to make sure you’ve set the USB permission correctly, first enable USB debugging on your device, then plug it on your computer and check the output of the following command:

android-sdk/platform-tools/adb devices

If you’ll see your device listed there, then you are in luck! You’ve successfully set up the USB permissions correctly. If not, then you will have to search more on the net :) .

Starting this step the GNU/Linux becomes trouble free!

In the end, we’ll see how to set up the Qt Creator for Android

  • Step one: fill android settings page.

Open Qt Creator. Goto Tools->Option->Android settings page and set Android SDK and NDK locations. Also make sure Automatically creates kits for Android tool chains is checked! The following image shows you how Android settings page looks on my computer:

QTC

  • Step two: check if Qt Creator created the Android kits.

Goto Tools->Option->Build & Run settings page, and click on Kits tab.The following image shows how it looks on my computer:

QTC1

  • Final step: Uncheck Warn when debugging “Release” builds.

Goto Tools->Option->Debugger settings page. The following image shows how it looks on my computer:

QTC2

Enjoy!

Now is the time to see if everything we’ve setup works well. To do that, open Qt Creator and create a new project. QWidget based or QML, it doesn’t matter. Just make sure you are choosing an Android KIT when you are creating it.

Hit the road Jack! OH, I mean hit the run button :) ! Qt Creator 3.0 (the one that comes with Qt 5.2 SDK) should popup a dialog with all compatible devices that are connected to your computer. Choose one device and continue. If your device isn’t there, then make sure you have read and followed the setup step from this article. In a few seconds your application should run on your device.

See you next time when we’ll discuss in detail how to use Qt Creator for Android to: create, deploy, debug and sign Qt apps for Android.

Thank you for your time!

Be free Qt on Android

$
0
0

In my first article that I wrote about Qt on Android I gave you a small introduction on how the port began and where is it now. I wrote about the fact that in November 2012 I contributed the port to Qt project, but I intentionally omitted one very important thing to tell you.

Before I contributed the port, me and Digia agreed to amend the KDE Free Qt Foundation license agreement and to add Android platform to it.

Qt on Android is now protected by the KDE Free Qt Foundation agreement. If you want to know more about Free Software, please read https://www.gnu.org/philosophy/free-sw.htm first.

Why did I want such an agreement and what it means for you? Well, to understand why, first I’d like to explain why I did the port :) :

  • first and foremost I publish it as free software because I truly believe in free software philosophy. Why I believe so much in free software? Almost everything I know, I know it because I could study and learn from free software. Ok, I went to school and I learn things there, but, I master what I’ve learned when I had access to free software. Because I got (and still get) a lot from free software, I considered that it came the time to give back something in return. This was what I could contribute to the free software world.
  • I started the port because I wanted to prove myself that I can do it!
  • last but not least, was because I could do it :) . I could do it because both projects were/are free and I had access to the source code. Well, Android is not that “free”, it is more “open” than “free”, but still I had access to its source code. I could do it because I had the luck to work a lot with Android as my daily job at Route 66, and of course also because it seems that I had the necessary knowledge (again, because of the free software) to do it :) .

    Because I love the freedom so much and because I wanted to protect my work, I asked for such agreement.

    What it means to you? It means that the Qt on Android port must always be kept for free (LGPL 2.1 & GPL 3), otherwise KDE Free Qt Foundation has the right to release Qt under BSD license if:

    BefreeQtonAndroid

    Here you can find the full agreement.

    Before I end this article, I want to make a few clarifications:
    Q: Will this agreement encourages you to use the free version and you don’t need anymore to buy a Qt license from Digia to use Qt on Android?
    A: NO! The agreement is not meant for such a thing. Actually even without this agreement you can still use the free version if you want. Personally I encourage everyone who can afford, to buy a Qt license. Qt needs a lot of money for improvements and to be maintained. Buying a license will help Qt and it will also help you!

    Q: Will this agreement forces Digia to free “Boot to Qt” port?
    A: Again, NO! “Boot to Qt” port is not based on my port. AFAIK (I didn’t see the code yet) is a completely different port and it targets other audience. “Qt on Android” port targets Android devices with full Android stack on them, these are the phones, tables, etc. that you are using every day. On the other hand “Boot to Qt” targets embeded devices with a stripped version of Android (doesn’t need Java and dalvik at all) check http://blog.qt.digia.com/blog/2013/05/21/introducing-boot-to-qt-a-technology-preview/ for more info. Because it doesn’t need Java and dalvik I can’t imagine how it can be based on my port!

    In the end:
    I’d like to thank to KDE for KDE Free Qt Foundation, for helping with the agreement and for hosting Necessitas project.
    I’d like to thanks to Digia for kindly accepting this agreement.
    I’d like to thank to KDAB because they offered me a great job, which will allow me to push the port even further!

    Here you can read Digia thoughts on this matter

  • Qt on Android Episode 3

    $
    0
    0

    Update: Here you can read also the Chinese version, thanks goes to

    Use Qt on Android

    After we learned how to setup the development environment, we’ll move forward in this article and learn how to use Qt Creator 3.0 (the one that comes with Qt 5.2 SDK) to create, run, debug and setup Qt apps on Android. The article covers only the Android specific Qt Creator parts!

    Prepare your Qt Project for Android

    If you want to start a new project or just want to test if you’ve setup the development environment correctly, then when you create a new project make sure you are also choosing an Android KIT. Check the following image: QTC_NewProject

    If you already have a project and you want to Androidize it, you just need to add an Android KIT to your existing project. Check the following image: QTC_AndroidizeProject

    To compile, deploy, run and debug Android apps, first you need to select an Android KIT. Check the following image: QTC_SelectAndroidKIT

    Let’s test it !

    To test the application on Android just press the Run/Debug button!
    Shortly a dialog will appear listing all compatible/incompatible connected devices and available emulators. Choose the desired device, and if you are planning to use the same device to run more than once this application, then you should check Use this device for architecture.., which means that you’ll will not be bothered again, Qt Creator will use this device automatically. The following image shows you how it looks on my computer: QTC_ChooseDevice

    If there is no device listed there then you should check first if you’ve setup the development environment correctly.

    In a few moments your application should run on your device. If you choose an AVD, it will take some time until it starts, so, please be patient!

    If you checked Use this device for architecture …, this option is remembered by Qt Creator until you reset the default devices or you close the project session. To reset the default devices, you need to open Projects perspective, click on Run tab, expand Deploy configurations and click on Reset Default Devices button.

    You don’t need to do anything special to debug Qt apps on your device/emulator, it just works out of box. Just make sure that your device uses Android API-10+.

    Android Manifest

    Every single Android application needs a manifest file. This is the entry point of your application, Android uses this file to decide which Application/Activity to start, it contains the application permissions, declares the minimum and the target Android API that application needs, and many more things.
    androiddeployqt (a tool used by Qt Creator to deploy your application) uses an Android Manifest template and fills a few default values to run your application. But in order to publish your application it is not enough, so we need to create an AndroidManifest.xml file. To do that, open Projects perspective, click on Run tab, expand Deploy configurations and click on Create AndroidmManifest.xml button. Don’t forget to add this file to your SCM. Check the following image too see how you create an AndroidManifest.xml file: QTC_CreateAndroidManifest

    Now, after we’ve created the AndroidmManifest.xml it’s time to set it up. Qt Creator should open the AndroidmManifest.xml file automatically after you created it.

    QTC_EditAndroidManifest

    As you can see Qt Creator provides a nice, easy to use editor for it. Using the editor you can set the following fields:

    • Package name. The package name is:
      • reversed URL e.g. com.kdab.QtControlsExample
      • serves as a unique identifier
      • don’t change after publishing, app would no longer be upgradable
    • Version code/name. Next step is to set the version code and version name. For the start you don’t need to change anything, but every time when you publish a new application you must change these fields, so they are very important.
      • Version code – used by Android and markets to distinguish between versions
      • Version name – user visible version string, displayed by Android O.S. and markets
      • Change (increase) both for every new release

      For more information about application versions check: http://developer.android.com/tools/publishing/versioning.html

    • Minimum and target SDK. Qt Creator editor uses Minimum and Target SDK to set node attributes.
      • Minimum required SDK – edits android:minSdkVersion attribute. Is an integer API version that is used by Android markets to filter the devices that can install the application. It also used by Android O.S. to prevent the application to be installed on lower versions.
      • Target SDK – edits android:targetSdkVersion attribute.
        Android docs says:”This attribute informs the system that you have tested against the target version and the system should not enable any compatibility behaviors to maintain your app’s forward-compatibility with the target version. The application is still able to run on older versions (down to minSdkVersion).”
        This attribute should not have any effects for Qt only Android apps though.

      For more information about application SDK versions check: http://developer.android.com/guide/topics/manifest/uses-sdk-element.html

    • Application name. Qt Creator helps you only to set the application name only for English version.
    • Run. Here you should select the application that you want to start. Most of the projects have only one application, so, it is not necessary to select anything here.
    • Permissions. Permissions are very important for an Android application. If you don’t set them properly your application can’t access O.S. resources (e.g. network, write on external storage, etc.).
      Starting with Qt 5.2 SDK, qmake uses ANDROID_PERMISSIONS variable to set the minimum permissions for every Qt Module that should be set automatically by androiddeployqt tool, but in some cases you need to add/remove them manually. Qt Creator helps you on this matter with a nice permissions editor.
      Your application should not declare more permissions than it really needs because it will scare away the users!
      Please consult Android’s manifest permissions page for more informations on this topic: http://developer.android.com/reference/android/Manifest.permission.html

    This is how the Qt Creator Android manifest editor looks like for my QtQuick example application. My example application doesn’t need any special permissions, so I removed all of them.
    QTC_EditAndroidManifestFinal

    The Android manifest is quite complicated sometime you need to edit it manually. Qt Creator allows you to switch to XML Source.
    QTC_EditAndroidManifestXMLSource

    The Android manifest is a beast! To master it please start by reading Android’s manifest page: http://developer.android.com/guide/topics/manifest/manifest-intro.html

    Android Target SDK, this is the SDK used to compile the java part of your application.
    Don’t be afraid to select the highest SDK available, your application will still run on any Android API-9+. Qt’s java part is using only API-9 code!

    “Say what? Yet another SDK? How many SDK do we need to set?” Well there are 4 (four) Android SDKs involved :), in the manifest file are 3 (Minimum, Target and Maximum) and this one.

    Additional libraries. Use this editor to add any 3rd party libs to your project. Qt Creator edits your .pro file and it sets ANDROID_EXTRA_LIBS qmake variable. Of course the developer should not try to mix incompatible libs e.g. a x86 library can’t be used by an arm application.

    Because KDAB guidelines says that I should not create articles which have more than 1k words (and this one has more) I need to stop here. See you next time when we’ll see what deploying systems are available for Qt on Android and how we do the package signing. These two steps are the most important before publishing!

    The post Qt on Android Episode 3 appeared first on KDAB.

    The future of Qt on Android looks bright

    $
    0
    0

    Urbi et Orbi

    A new year just started a few weeks ago, but Qt on Android doesn’t have time to rest :).

    The secret meeting

    At the beginning of the year I attended a very important workshop in Oslo. For two full days KDAB (me) and Digia (Oslo office folks) secretly discussed the future of Qt on Android. We talked about lots of features that we are planning to implement in Qt 5.3, 5.4 and even in 5.5 and beyond. Well, today I want to share with you some of the secret :)!

    In this article I’m going to highlight only one of them.

    The prom queen

    “Support for multiple surfaces and mixing raster/GL content” was by far the hottest topic, because lots of other features depend on it. It was also my top priority feature on my TODO list for Android.

    What is wrong with current implementation?
    Well current implementation supports only a single android native surface, which can be used either by raster only apps with multiple top level widgets (e.g. the drop down list of a combobox is a top level widget) or by OpenGL apps, but is limited to a single top level widget (the OpenGL one). This limitation is very annoying because it makes QGLWidgets apps unusable on Android. It also makes it impossible for Qt to use the android native media video player, which is (seems to be?) required to play DRM videos.

    A small step for Qt a giant leap for Qt on Android

    Folks, I have good news on this matter! Even though the holiday period is over, KDAB started this year with a great gift for all Qt on Android devs out there! A few days ago I managed to have a single Android platform plugin which can be used by apps that mix QGLWidgets with QWidgets.
    The mandatory screenshot:

    device-2014-01-15-160043

    To accomplish this task I had to find a way to create multiple native android surfaces. On most (all?) the platforms supported by Qt it is a pretty easy job to have multiple native windows, but on Android it is a real pain in the … you know where :). More about this topic on the “behind the scenes” part.

    Why didn’t I do it until now? Why did it take me so long to do it? Well, I had this feature in my mind for a very, very long time, but sadly I didn’t have enough time to check if it really works. KDAB gave me the needed time to do it :) !

    Behind the scenes

    This is the boring technical part, if you really don’t care how it works, you can jump to the limitations chapter, but for a better understanding of the limitations I do recommend you spend a few more moments and read this part.

    Why do we need multiple native android surfaces?
    For a better understanding let’s take a simple example: an application that needs a GL surface and also has some (old fashioned) QWidget-based controls. For this application Qt needs two surfaces, one for the GLWidget and one from the QWidget.

    Why is it so hard to create another native android surface?
    Well, there is no problem to create one more native android surface, the problem comes when you need to control its Z order. The Z order is very important. Let’s assume that you need to show a dialog on top of a GLWigdet, but you can’t guarantee that the new surface will be created on top of the GLWigdet surface. It is possible it will be created behind the GLWigdet surface so the user will not be able to see the new dialog.

    setZOrderMediaOverlay saved the day! This method does all the magic, it allows us to control whether the new surface is placed on top of another regular surface. We still can’t control the Z order of two surfaces that have the same ZOrderMediaOverlay flag! It just helps us to create one more drawing layer.

    How does it work for Qt?
    Now Qt uses three different layers:

    • the topmost layer contains a custom AbsoluteLayout view which is used by Qt to create a dummy (fully transparent) control every time you want to edit something. The dummy control is needed by Android window manager to pan/resize your application window when the software keyboard appears. The custom AbsoluteLayout view will be used in the future to add native controls (e.g. WebView).
    • the middle layer, is used by Qt to create a single SurfaceView with ZOrderMediaOverlay flag set to true! This surface is used by Qt to draw all raster windows. Yes, one surface is enough for all QWidget based top level widgets. Maybe in the future we can use it to push a single Qt GL Window that will be on top of another GL Windows.
    • the bottommost layer is used by Qt to create SurfaceView(s) which are used for GL windows and by native android media video player.

    Limitations

    As I said previously, ZOrderMediaOverlay only helped us to create a new layer (the middle one) but we still have the Z order problem for the surfaces created on the same layer.

    • the last layer surfaces can’t overlap (e.g. you can’t overlap correctly multiple GL Windows).
    • because the native controls will be placed on the topmost layer, Qt can’t put anything over them.
    • only basic transformations can be applied to native controls (position and size).

    Other changes done to android platform plugin

    Besides the work on creating multiple native surfaces, I did the necessary changes to have a single android platform plugin and reworked the raster and opengl code (got rid of eglfs and fbconvenience dependencies :)).

    The post The future of Qt on Android looks bright appeared first on KDAB.

    Qt on Android Episode 4

    $
    0
    0

    erratum 2014-04-13: Updated Bundle Qt libs pros and cons.

    Update2: Here you can read also the Chinese version, thanks goes to

    After we’ve learned how to set up the development environment and how to use Qt on Android, it’s time to move forward and in this article we are going to learn about different deployment systems and how to sign the package in order to publish it in any Android markets.

    Choosing the right deploying system

    Qt Creator supports three deployment systems:

    • Use Ministro service to install Qt
    • Bundle Qt libs in APK
    • Deploy local Qt libs to temporary directory

    Android_Qt_Creator_deployment

    Use Ministro service to install Qt

    Back in 2009, when I started this project, there were only a few devices out there with Android. Most of them had very limited free space (less than 100 Mb), so, using Qt statically or bundling Qt libs into the APK was out of the question, also back then Google Market had way more limited size than today (50Mb limit/apk). As you can see I was forced to invent Ministro.
    Even today most of the mid/low-end devices don’t have too much space!

    How it works?

    • Instead of bundling everything into your APK, your package will contain ONLY your application .so file(s), its needed resources and a list with all needed external libs.
    • When your application starts, it tries to connect to Ministro service, if it fails it means that Ministro is not installed and it opens the Android Play for the user to install Ministro. After it successfully connects to Ministro, it sends the dependencies list.
    • Ministro checks if these dependencies are already available, if not, then it downloads only the missing ones in a central secure location and it sends back to the application another list with all the needed libs that the application must load before it loads your qt application.
    • The application loads the libs from Ministro’s location, then your application, then it continues the running process.

    Now let’s see the advantages and disadvantages of using Ministro.

    Advantages:

    • Using Ministro, the user needs to download the Qt libs ONLY once. If the user downloads another Qt application, it will use the existing libraries. Of course if that application needs more libs, Ministro will download only those that are missing.
    • Ministro can detect if the device armv5 CPU has VFP or if the device armv7 CPU has NEON and it can download libs specific to that device CPU. Even if your application is not built with these CPU features, just using Qt libs built with them will make it run faster (on armv5, VFP really makes the difference, it will be way much faster). Currently these libs are not available, but I intend to publish them starting with 5.4.
    • Ministro can upgrade Qt libs, without you needing to release a new application.
    • You can target all Android platforms with a single APK. Because most likely your application (.so) file(s) are not very big, they can easily fit into a single APK. If your application doesn’t do intensive computation you can use only armv5 .so files to target both armv5 and armv7 platforms, because even if your APK contains only armv5 libs, Ministro will download the Qt libs specific for your device.
    • You can use your own Ministro sources with your own libraries. Basically you’ll need an HTTP/HTTPS server with a valid certificate and to create and upload Ministro’s repository to that server. Because there is a lot to tell on this topic, I’m going to create a wiki page with all the information you need about this topic.

    Disadvantages:

    • Some people don’t like Ministro because the users must install Ministro service once. There are lots of apps out there which require other services, if my mother can install and use Google Hangouts on an older Android version, which needs Google Play service to be installed manually, or MX Player that needs MX Player Codecs to be installed manually, I’m pretty sure she will be just fine with any Qt application which requires Ministro to be installed once.
    • Ministro upgrades Qt libraries and it might break things. I’m very concerned on this topic! To address this problem Ministro uses a different location for every major Qt release e.g:

      Even more, every source is using a Debian-like release scheme with three different repositories:

      • unstable – this is a pre-release repository used by Qt Project/Necessitas developers to test a new release. Before a new SDK release is announced, this repository is used to push the new libs and test it before officially announcing it.
      • testing – after all tests pass, the libs are moved from unstable to testing repository and then we announce them on https://groups.google.com/forum/#!forum/android-qt, http://lists.qt-project.org/pipermail/android-development and on http://mail.kde.org/pipermail/necessitas-devel. The new version will stay in testing repository for at least one month to give enough time for the developers to test their existing apps using the new libs. Additional updates will be released in testing repository and the period may be extended if any regressions are reported. A new update must stay at least two weeks in testing repository.
      • stable – after testing repository is regression free, the libs are moved to stable repository. It is very important that testing repository is regressions free before it lands on stable because in ~7 days all Android Ministro users will be notified about the new release and it will be very unpleasant if the users apps do not run any more!

    Using this scheme Ministro users have no regression in 4 years and 13 Necessitas releases and 5 Qt project releases!

    As you can see Ministro is quite safe on this matter!

    Bundle Qt libs in APK

    This feature was added recently to Qt Creator. Beside your application and your resources, Qt Creator adds all Qt libraries that your application needs to run.

    Advantages:

    • The APK contains everything it needs to run.
    • erratum 2014-04-13: The ability of including custom builds of Qt. Improves time-to-market as you don’t have to wait for official releases before you can get your crucial bug fix. There’s also no waiting period after a new version of Qt is released before you can deploy it with your application.
    • erratum 2014-04-13: The Qt libraries are not updated behind your back, no worries about sudden regressions.
    • erratum 2014-04-13: The libraries will be served with your package in the store’s main infrastructure, whereas the Ministro libraries are served in the Qt Project infrastructure. The latter has not been tested for very large download volumes, so at this point we do not know how well it can serve a hugely successful application.
    • erratum 2014-04-13: If done through Google Play, the download goes through the regular mechanisms on the device, so it continues in the background when your user suspends it, with progress indication in the status bar, and it obeys your users’ settings regarding downloads and updates over a mobile data connection.

    Disadvantages:

    • The APK is HUGE due to Qt libs which are pretty big (+40Mb/platform). erratum 2014-04-13: The APK is big comparing with the Ministro’s version, due to Qt files which are pretty big. Qt files can go slightly over 40Mb/platform if you are going to use all of Qt modules. Of course your application doesnt need all the modules, so, if your application uses only Qt Quick Controls + Qt SVG + Qt Multimedia + Qt Sensors + Qt XML modules, Qt files (libs + plugins + additional files) are ~20Mb/platform and your APK will be ~10Mb.
    • All Qt libs must be unpacked! So your application will need a lot of free space to run (+50Mb) erratum 2014-04-13: The APK is NOT deleted after you install the application, but is kept by Android O.S. in order to access its assets, so, don’t forget to to count its size as well. At first run, our application will extract Qt libs and plugin to the application home folder. To check exactly how much space your application uses, you have to go to Settings->Apps->your application, and check Total of the STORAGE section. I checked gallery Qt Quick Controls example with Qt SVG + Qt Multimedia + Qt Sensors + Qt XML and it occupies slightly over 35Mb. Currently only just a very few apps on Google Play require that much space to run.
    • Most of the mid/low-end device users can’t afford to spend that much free space!
    • Due to big size you can’t target more than one platform/apk. You must create an APK for every platform (armv5, armv7, x86). This will be confusing for armv7 users because AFAIK Google Play will list your application twice, once for armv7 and once for armv5 (see MX Player Codecs). If my mother can install a simple application, I’m pretty sure that she doesn’t know what kind of CPU her phone has, actually I’m pretty sure that she doesn’t know what a CPU is or if her device has such a thing … erratum 2014-04-13: it seems that Google Play doesn’t list your application twice.
    • Can’t use VFP on armv5 devices and NEON on armv7 devices.
    • Qt libs can’t be shared by multiple Qt apps on the same device.
    • Can’t get Qt libs updates automatically.

    As you can see there is no perfect solution, the pros from Ministro go to cons of the Bundle Qt libs in APK and the cons go to pros :).

    Deploy local Qt libs to temporary directory

    This deploy system is used mostly by Qt hackers when hacking on Qt itself because it is the fastest way to deploy modified Qt libs on the device to test them. Do not use it in production!

    In the end you are the one who will make the choice, I just wanted to present you all the advantages and disadvantages of every deployment system.

    Package Signing

    This is the last and most important step before publishing. In order to sign the package you’ll need a keystore and a self-signed certificate.

    If you don’t have such a certificate, Qt Creator can help you to easily create one, you just need to press create button and fill the keystore and certificate fields, check the following image:

    QTC_CreateCertificate

    You can only upgrade your application with the same certificate you publish it with! So, make sure you are making backups of the keystore file.

    If you already have a keystore, then just browse its location.

    Next step is to switch your project to release and check sign package and open package location after build, check the following image:

    QTC_SignPackage

    After you’ve pressed run button, in a few moments Qt Creator will open the location where your package was built and signed, be sure you are choosing the signed one (QtApp-release.apk)! Check the following image:

    QTC_SignOutput

    That’s all folks, see you next time when will see how to use JNI to extend our Android applications.

    The post Qt on Android Episode 4 appeared first on KDAB.

    Qt on Android Episode 5

    $
    0
    0

    Update: Here you have also the Chinese version, thanks goes to Foruok

    After we’ve seen how to set up the development environment, how to use Qt on Android and what deployment systems are available and how to sign the final package, it’s time to move forward. In this article we are going to learn about JNI.

    Why do we need JNI?

    Because it is impossible for Qt to implement all Android features. To use any of them we’ll need to use JNI to access them. JNI the only way to do calls to/from Java world from/to native (C/C++) world.

    JNI intro

    In this article we’ll learn the basics of the JNI, in the next article(s) we’re going to learn how to use this knowledge to correctly extend Qt on Android apps.

    There is tons and tons of information on this matter on the net, in this article I’m focusing only on how to do JNI on Android using Qt. Starting with 5.2, Qt ships Qt Android Extras module. This module makes our life much more pleasant when we’ll have to do JNI.

    There are two use cases:

    • Call a Java function from C/C++
    • Callback a C/C++ function from Java

    Call a Java function from C/C++

    Calling a Java function from C/C++ using Qt Android Extras module is quite easy.

    First let’s create a Java static method:

    // java file android/src/com/kdab/training/MyJavaClass.java
    package com.kdab.training;
    
    public class MyJavaClass
    {
        // this method will be called from C/C++
        public static int fibonacci(int n)
        {
            if (n < 2)
                return n;
            return fibonacci(n-1) + fibonacci(n-2);
        }
    }
    

    So, we defined fibonacci static method into MyJavaClass class into com.kdab.training package. This method returns the computed fibonacci number.

    Now let’s see how to call it from Qt. The first step is to make sure we are using the android extras, so we need to add it to our .pro file.

    # Changes to your .pro file
    # ....
    QT += androidextras
    # ....
    

    Then do the actual call:

    // C++ code
    #include <QAndroidJniObject>
    int fibonacci(int n)
    {
        return QAndroidJniObject::callStaticMethod<jint>
                            ("com/kdab/training/MyJavaClass" // class name
                            , "fibonacci" // method name
                            , "(I)I" // signature
                            , n);
    }
    

    Yes, that’s all folks!

    Let’s take a closer look to this code and see what we have here:

    • we are using QAndroidJniObject::callStaticMethod to call a Java static method.
    • first argument is the fully-qualified class name. The fully-qualified name for a class (or interface) is the package name (com/kdab/training) followed by the class/interface name(MyJavaClass), separated by a slash (/) (NOT by a period, the period is used only in Java world not in C/C++ world!)
    • the next argument is the method name
    • the next is the method signature
    • the next arguments are the arguments that will be passed to the java function

    Please check QAndroidJniObject documentation for more information about method signature and the arguments types.

    Callback a C/C++ function from Java

    In order to callback a C/C++ function from Java you need to do the follow steps:

    • declare the native method(s) in Java, using native keyword
    • register native method(s) in C/C++
    • do the actual call

    Declare the native method(s) in Java, using native keyword.

    Let’s change the previous java code a little bit:

    // java file android/src/com/kdab/training/MyJavaClass.java
    package com.kdab.training;
    
    class MyJavaNatives
    {
        // declare the native method
        public static native void sendFibonaciResult(int n);
    }
    
    public class MyJavaClass
    {
        // this method will be called from C/C++
        public static int fibonacci(int n)
        {
            if (n < 2)
                return n;
            return fibonacci(n-1) + fibonacci(n-2);
        }
    
        // the second method that will be called from C/C++
        public static void compute_fibonacci(int n)
        {
            // callback the native method with the computed result.
            MyJavaNatives.sendFibonaciResult(fibonacci(n));
        }
    }
    

    Let’s take a closer look to this code and see what we have here:

    • personally, I prefer to keep all my native method(s) in a separate class, so, I declared sendFibonaciResult native method into MyJavaNatives class into com.kdab.taining package. This native method will be used by compute_fibonacci static method to callback the C/C++ world to send the computed result instead to return it as fibonacci method does.
    • compute_fibonacci, this method will be called from C/C++, but instead to return the result as fibonacci method does, it uses sendFibonaciResult native method to callback the C/C++ world to end the result.

    If you try only this code it will fail, because sendFibonaciResult is not registered, and Java VM doesn’t know it yet.

    C/C++ register native methods

    Now let’s see how to register the function in C/C++.

    First thing you need to know is that you can register only function(s). You can NOT register C++ class (non-static) members!

    There are two ways to register native methods, we are going to check both ot them:

    Registering functions using Java_Fully_Qualified_ClassName_MethodName

    #include <jni.h>
    #include <QDebug>
    
    #ifdef __cplusplus
    extern "C" {
    #endif
    
    JNIEXPORT void JNICALL
      Java_com_kdab_training_MyJavaNatives_sendFibonaciResult(JNIEnv *env,
                                                        jobject obj,
                                                        jint n)
    {
        qDebug() << "Computed fibonacci is:" << n;
    }
    
    #ifdef __cplusplus
    }
    #endif
    

    Let’s take a closer look to this code and see what we have here:

    • First thing we’ve seen, is that all the functions must be exported as C functions and NOT as C++ functions!
    • The function name MUST follow the next template: Java word, followed by the package name, then followed by the class name, then followed by the method name,separated by an underscore (_)
    • When JavaVM loads the .so file, it will search for this template and it will automatically register all your functions for you
    • the first argument (env) of the function is a pointer to JNIEnv object.
    • the second argument (obj) is a reference to the Java object inside which this native method has been declared.
    • the first and second arguments are mandatory for every function that you’ll register.
    • the next arguments must match the java native method arguments. So, our third argument is actually our first (and only) java native method argument. This is the argument that compute_fibonacci will pass to sendFibonaciResult native method when it calls it.

    Using this method to register is quite easy to declare and register, but it has a few disadvantages:

    • the function names are huge:

      Java_com_kdab_training_MyJavaNatives_sendFibonaciResult

    • the library must to export all functions
    • unsafer, there is no way for the JavaVM to check the function signature, because the functions are exported as C functions and NOT as C++ functions!

    Use JNIEnv::RegisterNatives to register native functions

    In order to use JNIEnv::RegisterNatives to register native functions, we need to do the following 4 steps to use it:

    • step 1: we need get access to an JNIEnv pointer. The easiest way is to define and and export JNI_OnLoad function, (once per .so file) in any .cpp file we like.
    • step 2: create a vector with all C/C++ methods that we want to register.
    • step 3: find the ID of java class that declares these methods using JniEnv::FindClass
    • step 4: call JNIEnv::RegisterNatives(java_class_ID, methods_vector, n_methods)
    // C++ code
    #include <jni.h>
    #include <QDebug>
    
    // define our native method
    static void fibonaciResult(JNIEnv */*env*/, jobject /*obj*/, jint n)
    {
        qDebug() << "Computed fibonacci is:" << n;
    }
    
    // step 2
    // create a vector with all our JNINativeMethod(s)
    static JNINativeMethod methods[] = {
        { "sendFibonaciResult", // const char* function name;
            "(I)V", // const char* function signature
            (void *)fibonaciResult // function pointer
        }
    };
    
    // step 1
    // this method is called automatically by Java VM
    // after the .so file is loaded
    JNIEXPORT jint JNI_OnLoad(JavaVM* vm, void* /*reserved*/)
    {
        JNIEnv* env;
        // get the JNIEnv pointer.
        if (vm->GetEnv(reinterpret_cast<void**>(&env), JNI_VERSION_1_6)
               != JNI_OK) {
            return JNI_ERR;
        }
    
        // step 3
        // search for Java class which declares the native methods
        jclass javaClass = env->FindClass("com/kdab/training/MyJavaNatives");
        if (!javaClass)
            return JNI_ERR;
    
        // step 4
        // register our native methods
        if (env->RegisterNatives(javaClass, methods,
                                sizeof(methods) / sizeof(methods[0])) < 0) {
            return JNI_ERR;
        }
        return JNI_VERSION_1_6;
    }
    

    Let’s check the code for a better understanding:

    • static void fibonaciResult(JNIEnv */*env*/, jobject /*obj*/, jint n) it is the method that we’re registering and which Java VM will call.
    • the first argument (env) of the function is a pointer to JNIEnv object.
    • the second argument (obj) is a reference to the Java object inside which this native method has been declared.
    • the first and second arguments are mandatory for every function that you’ll register.
    • the next arguments must match the java native method arguments. So, our third argument is actually our first (and only) java native method argument. This is the argument that compute_fibonacci will pass to sendFibonaciResult native method when it calls it.
    • we add the method to a vector (methods) of JNINativeMethod structures.
    • JNINativeMethod structure has the following fields:
      • const char* name – it is the function name, it has to be exactly as the native function name that we’ve declared in Java
      • const char* signature – it is the function signature, it has to match the native function arguments that we’ve declared in Java
      • void* fnPtr – it is the C/C++ function pointer. In our case it’s a pointer to static void fibonaciResult(JNIEnv */*env*/, jobject /*obj*/, jint n) function. As you can see the C/C++ function name doesn’t matter, the Java VM needs only a pointer to it.
    • the rest of the code is clear and easy and I don’t think it needs any explanations than the comments.

    Even if it looks a little bit complicated to use it, this method has the following advantages:

    • the C/C++ function can have any name you want
    • the library needs to export only one function (JNI_OnLoad)
    • safer, because the Java VM checks the declared signature

    It’s just a matter of taste which method you decide to use to register your native functions. I do recommend you to use JNIEnv::RegisterNatives as it offers you extra protection because the Java VM checks the functions signature and it throws an exception if it doesn’t match.

    Conclusion

    In this article we’ve learned the basics of the JNI, in the next article(s) we’re going to learn how to use this knowledge to correctly extend Qt on Android apps. We’ll talk more about Qt on Android apps architecture, how to extend the Java part of your application and we’ll take a real life example to show how to correctly do safe calls from Qt thread to Android UI thread and vice-versa.

    Thank you for your time!

    The post Qt on Android Episode 5 appeared first on KDAB.

    Fun with Android

    $
    0
    0

    AKA: I know what you did last Christmas !

    Hello folks,

    I’d like to share with you a few things that I did during this Xmas.

    Besides the fact I’ll never ever take a vacation before Xmas, because Brasov is a tourist attraction and it was FULL of tourists in that period. I could ski only once :( , because it snowed just a few days before New Year and then the police closed the roads to the ski resort because there were way too many cars in that area.

    Anyway it was also great because I spent a lot of time with my family. But because there was no snow outside, I also had some time for myself and I didn’t want to waste it all. So, for the sake of old times, I started to buy some old games (from gog.com) and I began to play them with my son. But we soon finished most of them and we started to play 0 A.D. a super cool and free (as in freedom and also as in beer) strategy game. After a while my son asked me if he can play that game on a tablet. I said:

    “at this moment you can’t play it, but I’ll take a look :)

    This is how my new journey began, and this is what this article is about :) .

    Strangely, exactly five years ago I began another journey, on the same day I started the Qt on Android port ;-).

    Chapter I

    So, I began to check the source code and I posted my intention on wildfiregame’s forum and then, I started the 0 A.D. game engine port:

    • the first step was to compile all 0 A.D. dependencies, TBH this was the most time-consuming step and it wasn’t fun at all. Qt framework has all the features that 0 A.D. needs and my first approach was to use Qt instead of all 0 A.D.’s dependencies but 0 A.D. developers didn’t like it and I had to cross-compile all the dependencies for Android. This step was already begun some time ago by someone else, but it was quite unfinished. The good news is that I learned how to cross-compile automake, cmake, etc. projects for Android ;-). Again this job is anything but fun :) .
    • the next step was to add to 0 A.D. a first citizen class support for Android, that I can use to code, deploy, run & debug on Android. Even though I know how to debug Android apps from a terminal, I’m way WAY to lazy to do such a thing. Of course the only choice I had, was QtCreator. When I designed QtCreator’s Android plugin, I did it in such a way that it can be used also by non-qt apps, but I never had the chance to put that theory to the test 😀 . So, after I had added qmake project files, (nope, I don’t like qmake that much, I chose qmake simply because it is the only build system that can be used by QtCreator to target Android devices), it was time to test if I can use QtCreator to develop non-qt apps on Android. Folks, I’m happy to let you know that QtCreator works just fine with non-qt apps to target Android! In this step I had to update the Android (java) part of the project to add debug support needed by QtCreator.
    • the next step was to fix all the crashes and enable all 0 A.D. features. Using QtCreator and being able to debug the application in a decent way, this job was quite easy, and soon I fixed all (visible) crashes and I enabled all 0 A.D.’s features!
    • but la vie is not always en rose and I faced a problem that was way beyond my (current) knowledge. 0 A.D. had some problems with GLES on Android. Together with an 0 A.D. developer, we started hunting this errors. But this job was extremely hard and boring … The problem was that I had to add tones to glGetError() to find the place where the error occurred… after a long time, we managed to hunt down one of the errors. But a few more still remained. Thanks to my legendary laziness, I started to look for another much easier solution. That guy asked me if Android has any OpenGL debuggers/tracers. After that moment I become obsessed by the idea of finding a decent solution to debug/trace OpenGL calls on Android.

    Chapter II

    AKA: The quest of hunting down 0 A.D.’s GLES problems!

    So, the big question is: Are there any decent OpenGL debuggers/tracers for Android? A quick search on the net answered my question. It seems there are a few OpenGL debuggers/tracers for Android. So, I started to check if any of them are decent and useful :) .

    • I began my research with Android’s own tool. To start tracing is quite easy: you need to start the application on the device, click on trace icon (in that tool), choose a file (on your desktop), check a few options and wait … After the trace was finished I was very anxious to see which one of the +10k OpenGL calls/frame caused the problem! Sadly I had a very unpleasant surprise. The thing didn’t point me to the problem at all :( . Even more, going from one frame to another takes an eternity… so, at least for me, this tool was no good.
    • then I found Mail’s graphics debugger. After a quick look on their website my heart was full of hope! MGD is not that easy to use, but I managed to get it deployed on Android. I started the GUI and I also got it connected to application on the device. But after this step my hope was ruined and my heart broken. After it connects to GUI the application crashes on the device; it seems it has some unimplemented EGL/GLES APIs :( . Of course my first thought was that I did something wrong and I started to dig deeper, but no luck, so, one more OpenGL debugger off my list.
    • the next tool on my list was powervr. I looked at it with a lot of hope but that soon vanished because, after I downloaded, the “SDK” asked me for root permissions to install. I wasn’t that desperate to give it root permissions!
    • I briefly checked NVidia’s Tegra graphics debugger, but I didn’t even dare to download it because I don’t have any Tegra Devices.
    • The last tool I checked was apitrace. Folks it was love at first sight! Even though apitrace is not as easy to use as Google’s tool, I managed to integrate it quite easy (and in a decent way) into 0 A.D.’s project. After I created the trace, I pulled it from the device to check it. TBH after the previous failures, my hope was not that great, but I took the courage to check it anyway. Folks, apitrace’s GUI it a gazillion times faster than Google’s tool! I was extremely surprised to see my laptop really replaying the trace and finding some errors! I began to check those errors and I soon found out that my desktop GLES implementation is not the same as the one on Android :( … Most probably most Android implementations are not the same (e.g. Mali’s implementation is probably different from Adreno’s). The only hope to catch those errors was, somehow, by doing the retrace on Android alone …

    Chapter III

    Retracing on Android … AKA: Mission Impossible

    So, I started to check the apitrace (retrace) source code to see how and if it can be ported on Android. The challenge was to pass the application arguments and to redirect somehow the stdout and stderr from the device to the desktop.

    Apitrace (retrace) uses stdout, stderr to send back results to the user/UI. So, the only way to do it, it was to hook stdout and stderr on Android and redirect all the traffic to a pair of sockets, then forward those sockets (using adb) to the desktop. I also chose to use stdout socket to send the params to application on device. But what if the application doesn’t have INTERNET permission set, which is needed for sockets? What if those ports are already in use? This was an easy task, because I asked myself the same question a few months ago, when I worked on Android 5.0 support, so I chose to use LocalServerSocket instead of the old fashioned sockets. This way all the potential problems were avoided.

    So, I created an android GLES retrace on the C++ side (based on egl_x11), a custom Android Activity, a custom Surface, etc. Of course, I also added QtCreator support (yeah more qmake projects 😀 ), to be able to debug, and soon, I had a working Android retracer!

    I could use it via telnet with just a few steps (I’m listing those steps because they can be used to debug the connection):

    • start apitrace application on Android.
    • forward ports (once is enough):
      adb forward tcp:1234 localabstract:apitrace.github.io.eglretrace.stdout
      adb forward tcp:1235 localabstract:apitrace.github.io.eglretrace.stderr
      
    • connect to both channels
      telnet 127.0.0.1 1235
      telnet 127.0.0.1 1234
      
    • then send the arguments via stdout channel (1234 port in our example)
      -d /sdcard/0ad/appdata/logs/pyrogenesis.trace
      

    But, as you can see, is not very easy to use and I couldn’t use the UI …

    Again, my titanic laziness come into place, and I began to work on a decent way to do retrace on Android using the existing UI.

    IMHO a decent retracing on Android needs to meet the following requirements:

    • a way to pull the trace from device to desktop
    • a way to push a trace from desktop to an Android device, if the trace was done on another device and you have it on your desktop.
    • a way to link a desktop trace file with an Android trace file
    • automatically starts the retrace application on device
    • forwards the ports (using adb) to desktop
    • connect to those ports, send the params
    • read the data from ports instead of QProcess stdout, stderr

    Folks, I’m proud to let you know that I managed to finish all those requirements! I’m quite pleased how it ended up! All the mysterious errors were revealed!

    Of course because I want all the people to enjoy a decent Android OpenGL debugging, I created the pull request for all my work.

    Using apitrace on Android I knew which OpenGL commands caused the errors! This helped an 0 A.D. developer, (Philip` is his nickname on irc), to fix these errors in a few minutes. I needed his help because my OpenGL skills are close to 0 (A.D.) and making an Android retracer didn’t make me smarter at all in that area :).

    Of course this is the first step to get 0 A.D. on Android, there is a lot of work to be done before we’ll be able to enjoy it on our tablets!

    If anyone wants to join this fantastic free project, please check 0 A.D.’s participate page. 0 A.D. is a project where anyone can help not only programmers! If you are an artist that knows how to paint, create music, write scenarios, have a nice voice, etc., or you want to help with translations for the game, in your own language, you can join and contribute!

    Also apitrace needs contributors, if you want to help, then you can check their TODO list to see if you can make the world a better place 😉 !

    My apitrace repo is here and the pull request here.

    My 0 A.D. repo is here and the patches here and here you have info about how to compile 0 A.D. on Android.

    About KDAB

    KDAB is a consulting company dedicated to Qt and offering a wide variety of services and providing training courses in:

    KDAB believes that it is critical for our business to invest into Qt3D and Qt, in general, to keep pushing the technology forward and to ensure it remains competitive. Unlike The Qt Company, we are solely focused on consultancy and training and do not sell licenses.

    The post Fun with Android appeared first on KDAB.


    Qt on Android Episode 6

    $
    0
    0

    Update: Here you have also the Chinese version, thanks goes to Foruok

    In the last Qt on Android episode we learned the basics of JNI on Android in a Qt way. In this episode I’d like to focus on tools that will help us to be more productive when we extend our Qt on Android applications.

    Using an external IDE to manage Java files.

    Sadly, the Java support in Qt Creator is very limited, and in order to be productive we need to use an external IDE to easily extend and debug the Java part of our application. Android provides two powerful IDEs:

    • Android Studio
    • Eclipse (recently deprecated).

    This article will focus only on Android Studio.

    But before we talk more about tools, let’s check the Android specific files which are part of your project.

    As I told you in the first article, any Qt on Android application has two big parts:

    • The native part, which is your C/C++ [Qt] code built into one or more .so files.
    • The Android specific part:
      • Android manifest file.
      • Android build system file(s).
      • Two Java classes which are needed to load your application dependencies, the application .so files and start the application.
      • Ministro service .aidl files and other resources, e.g. assets, strings, images, etc.

    All the Android specific files are needed to build your android package (as we learned in episode 3). But where are all these files? Why are only a few files copied to your sources when you press “Create templates” button (as shown in the next image)? QTC_CopyAndroidTemplates_o

    Well, Java, Ministro service .aidl files and some resources are kept “hidden” in your Qt SDK. We don’t want to copy them to your source tree for two reasons:

    • We might change them from version to version and we might break the compatibility. If they are part of your project it will be impossible to upgrade them and your application will misbehave (e.g. Java files from Qt 5.4 might not be compatible with Qt 5.5).
    • We don’t want you to change them, because the code in these files is quite sensible, hard to explain and understand and changing them might break your application behavior. If you should not change them, then all your applications will share the same files, so again there is no point in copying them :).

    Before Qt 5.4 it was quite complicated to extend the Java part of your application, mostly because you could not use an external IDE (Eclipse) in a decent way (e.g. with syntax highlighting, code-completion, code-refactoring, etc.). In order to get these goodies you had to manually copy all the Java files from Qt SDK installation folder to your application source folder, but as I said, we don’t want you to do that and the only way to do it was to copy them locally and not add them to your SCM…

    But starting with Qt 5.4. the situation changed when I added Gradle support to Qt 5.4 and to Qt Creator 3.3. Gradle is the new recommended android build system which is used by Android Studio. Using Gradle we can keep all these files hidden and still give you all the goodies that you expect from a 21st century IDE. So, if you are planning to extend your Java part of your application, it is highly recommended to Copy the Gradle files to Android directory as shown in the next image: QTC_CopyAndroidTemplatesCopyGradle_o

    Besides the AndroidManifest.xml and res/values/libs.xml files, the wizard will copy a few more:

    • build.gradle – this is the project file needed by Android Studio.
    • gradlew[.bat] – build script wrapper used to build Java part and to create final APK.
    • gradle/wrapper/* – build script wrapper files

    build.gradle is very important, it allows you to easily add dependencies to your project.

    E.g. to add PlayServices to your application you just need to add:

    dependencies {
        ...
        compile 'com.google.android.gms:play-services:7.0.0'
    }
    

    to build.gradle, check this page for more info on this matter.

    Now let’s see how to use Android Studio with Qt:

    Android Studio will be used only to:

    • open the Gradle project.
    • create, edit the java files.
    • debug the Java part.

    Android Studio will NOT be used to run your Qt application, you still need to use Qt Creator for that job!

    Let’s take a look on how to import the Java part of your Qt application and how to debug it.

    The import step is very easy: you just need to Open the existing build.gradle project file. Check the following image: AndroidStudio_OpenProject_o

    Warning: Qt 5.4.0 users should upgrade their gradle files using Qt 5.4.1 or later (press again Create templates button and overwrite only gradle files). This step is needed because Qt 5.4.0 uses an old Gradle plugin and, after we released it, Google, as usual, broke the compatibility with older Gradle plugins and Android Studio doesn’t import Qt 5.4.0 projects.

    The last thing we are going to learn today is how to debug the Java part using Android Studio. You need to take the following steps:

    • set the breakpoints
    • attach debugger (Run->Attach debugger to Android process)
    • start the application using QtCreator
    • wait for application to start (you should see it in Attach debugger dialog).
    • select the application
    • click the OK button

    After the last step, your application will be stopped by Android Studio when it hits first breakpoint.The problem comes when we need to start the debugging very early. To do that we are going to use the old fashioned sleep trick Debug.waitForDebugger() function.

    This is how our custom onCreate function looks:

    @Override
    public void onCreate(Bundle savedInstanceState)
    {
        Debug.waitForDebugger();
        // ....
        super.onCreate(savedInstanceState);
    }
    

    Now the application waits until a debugger attaches, then in resumes the execution.

    Now that we have learned the basics of the JNI and how to use external tools to make la vie en rose (or la dolce vita), in the next article we will talk about Qt on Android apps architecture: how to extend the Java part of your application using a real life example to show how to correctly do safe calls from Qt thread to Android UI thread and vice-versa.

    The post Qt on Android Episode 6 appeared first on KDAB.

    Qt on Android Episode 7

    $
    0
    0

    Update: Here you have also the Chinese version, thanks goes to Foruok

    In the last two Qt on Android episodes we learned how to use basic JNI on Android and how to use an external IDE to easily manage the Java part. In this episode, it is time to move forward and focus on extending our Qt on Android Java part and also how to interact with it using JNI in a “safe way”.

    In this part we are going to implement an SD-Card listener. This is quite a useful example for applications that are using SD-Cards to store their data, because if the application doesn’t close all the opened files immediately when it gets the notification, it will be killed by the Android O.S.

    As we’ve seen in Episode 5 it’s quite easy to call a Java method from C/C++ and a C/C++ function from Java, but it doesn’t work on all cases. But why not?

    To understand why not, we need first to understand the Qt on Android architecture.

    Architecture diagram:

    Java-Qt

    A few words about the architecture diagram.

    • the left blue rectangle represents the Android UI thread
    • the right green rectangle represents the main Qt thread (where the main QEventLoop is running). Read Episode 1 if you want to learn more about Android UI & Qt threads)
    • the top (black) rectangle is the Java part of your application. As you can see the biggest part of it runs on the Android UI thread. The only case when the Java part runs on the Qt thread is when we call it from C/C++ from Qt thread (as most of the JNI calls will come from there).
    • the bottom (black) rectangle is the C/C++ (Qt) part of your application. As you can see the biggest part of it runs on the Qt thread. The only case when the C/C++ part runs on the Android UI thread is when it’s called from the Java part from Android UI (as most of the Java callbacks will be from there).

    Ok … so what’s the problem? Well, the problem is that there are SOME Android APIs that MUST be called from Android UI thread, and when we call a Java method from C/C++ we do it from Qt thread. It means that we need a way to run that code on Android UI not on Qt thread. To do such a call, from C/C++ Qt thread to Java Android UI thread, we need to do 3 steps:

    1. call a Java method from C/C++ Qt thread. The Java method will be executed in Qt thread, so we we need a way to access Android APIs in Android UI thread.
    2. our Java method uses Activity.runOnUiThread to post a runnable on Android UI thread. This runnable will be executed by the Android event loop on Android UI thread.
    3. the runnable accesses the Android APIs from Android UI thread.

    The same problem occurs when Java calls a C/C++ function, because Java will call our C/C++ functions from Android UI and we need a way to pass that notification on Qt thread. Again there are 3 steps involved:

    1. call a C/C++ function from Android UI thread.
    2. use QMetaObject::invokeMethod to post a method call on Qt event loop.
    3. Qt event loop will execute that function on Qt thread.

    Extending the Java part:

    Before you start, make sure you read Episode 6 one more time because you’ll need it to easily manage the Java files. First step is to create a custom Activity by extending QtActivity and defining a method which will post our Runnable.

    // src/com/kdab/training/MyActivity.java
    package com.kdab.training;
    
    import org.qtproject.qt5.android.bindings.QtActivity;
    
    public class MyActivity extends QtActivity
    {
        // this method is called by C++ to register the BroadcastReceiver.
        public void registerBroadcastReceiver() {
            // Qt is running on a different thread than Android.
            // In order to register the receiver we need to execute it in the Android UI thread
            runOnUiThread(new RegisterReceiverRunnable(this));
        }
    }
    

    Java-Qt_1-2

    Next step is to change the default activity to AndroidManifest.xml, from:

    <activity ...
            android:name="org.qtproject.qt5.android.bindings.QtActivity"
            ... >
    

    to:

    <activity ...
            android:name="com.kdab.training.MyActivity"
            ... >
    

    We need to do this to make sure that our custom Activity will be instantiated when the application starts.

    Next step is to define our RegisterReceiverRunnable class: The run method of this class will be called on Android UI thread. In run method we register our SDCardReceiver listener.

    // src/com/kdab/training/RegisterReceiverRunnable.java
    package com.kdab.training;
    
    import android.app.Activity;
    import android.content.Intent;
    import android.content.IntentFilter;
    
    public class RegisterReceiverRunnable implements Runnable
    {
        private Activity m_activity;
        public RegisterReceiverRunnable(Activity activity) {
            m_activity = activity;
        }
        // this method is called on Android Ui Thread
        @Override
        public void run() {
            IntentFilter filter = new IntentFilter();
            filter.addAction(Intent.ACTION_MEDIA_MOUNTED);
            filter.addAction(Intent.ACTION_MEDIA_UNMOUNTED);
            filter.addDataScheme("file");
    
            // this method must be called on Android Ui Thread
            m_activity.registerReceiver(new SDCardReceiver(), filter);
        }
    }
    

    Java-Qt_3

    Let’s check what SDCardReceiver class looks like:

    // src/com/kdab/training/SDCardReceiver.java
    package com.kdab.training;
    
    import android.content.BroadcastReceiver;
    import android.content.Context;
    import android.content.Intent;
    
    public class SDCardReceiver extends BroadcastReceiver {
        @Override
        public void onReceive(Context context, Intent intent) {
            // call the native method when it receives a new notification
            if (intent.getAction().equals(Intent.ACTION_MEDIA_MOUNTED))
                NativeFunctions.onReceiveNativeMounted();
            else if (intent.getAction().equals(Intent.ACTION_MEDIA_UNMOUNTED))
                NativeFunctions.onReceiveNativeUnmounted();
        }
    }
    

    Java-Qt_4SDCardReceiver overrides onReceive method, then it uses the declared native functions to send the notification to C/C++.

    Last step is to declare our native functions that we used in SDCardReceiver:

    // src/com/kdab/training/NativeFunctions.java
    package com.kdab.training;
    
    public class NativeFunctions {
        // define the native function
        // these functions are called by the BroadcastReceiver object
        // when it receives a new notification
        public static native void onReceiveNativeMounted();
        public static native void onReceiveNativeUnmounted();
    }
    

    Architecture diagram Java:

    Let’s see the summary of the Java part calls on our architecture diagram:

    Java-Qt_Java_final

    Extending C/C++ part:

    Now let’s see how we extend the C/C++ part. To illustrate how to do it, I’m using a simple widget application.

    First thing we need to do, is to call the registerBroadcastReceiver method.

    // main.cpp
    #include "mainwindow.h"
    #include <QApplication>
    #include <QtAndroid>
    
    int main(int argc, char *argv[])
    {
        QApplication a(argc, argv);
    
        // call registerBroadcastReceiver to register the broadcast receiver
        QtAndroid::androidActivity().callMethod<void>("registerBroadcastReceiver", "()V");
    
        MainWindow::instance().show();
        return a.exec();
    }
    

    Java-Qt_1


    // native.cpp
    #include <jni.h>
    
    #include <QMetaObject>
    
    #include "mainwindow.h"
    
    // define our native static functions
    // these are the functions that Java part will call directly from Android UI thread
    static void onReceiveNativeMounted(JNIEnv * /*env*/, jobject /*obj*/)
    {
        // call MainWindow::onReceiveMounted from Qt thread
        QMetaObject::invokeMethod(&MainWindow::instance(), "onReceiveMounted"
                                  , Qt::QueuedConnection);
    }
    
    static void onReceiveNativeUnmounted(JNIEnv * /*env*/, jobject /*obj*/)
    {
        // call MainWindow::onReceiveUnmounted from Qt thread, we wait until the called function finishes
        // in this function the application should close all its opened files, otherwise it will be killed
        QMetaObject::invokeMethod(&MainWindow::instance(), "onReceiveUnmounted"
                                  , Qt::BlockingQueuedConnection);
    }
    
    //create a vector with all our JNINativeMethod(s)
    static JNINativeMethod methods[] = {
        {"onReceiveNativeMounted", "()V", (void *)onReceiveNativeMounted},
        {"onReceiveNativeUnmounted", "()V", (void *)onReceiveNativeUnmounted},
    };
    
    // this method is called automatically by Java after the .so file is loaded
    JNIEXPORT jint JNI_OnLoad(JavaVM* vm, void* /*reserved*/)
    {
        JNIEnv* env;
        // get the JNIEnv pointer.
        if (vm->GetEnv(reinterpret_cast<void**>(&env), JNI_VERSION_1_6) != JNI_OK)
          return JNI_ERR;
    
        // search for Java class which declares the native methods
        jclass javaClass = env->FindClass("com/kdab/training/NativeFunctions");
        if (!javaClass)
          return JNI_ERR;
    
        // register our native methods
        if (env->RegisterNatives(javaClass, methods,
                              sizeof(methods) / sizeof(methods[0])) < 0) {
          return JNI_ERR;
        }
    
        return JNI_VERSION_1_6;
    }
    

    Java-Qt_4-5

    In native.cpp we are registering the native functions. From our static native functions we are using QMetaObject::invokeMethod to post the slots call to Qt thread.


    // mainwindow.h
    #ifndef MAINWINDOW_H
    #define MAINWINDOW_H
    
    #include <QMainWindow>
    
    namespace Ui {
    class MainWindow;
    }
    class MainWindow : public QMainWindow
    {
        Q_OBJECT
    
    public:
        static MainWindow &instance(QWidget *parent = 0);
    
    public slots:
        void onReceiveMounted();
        void onReceiveUnmounted();
    
    private:
        explicit MainWindow(QWidget *parent = 0);
        ~MainWindow();
    
    private:
        Ui::MainWindow *ui;
    };
    #endif // MAINWINDOW_H
    
    // mainwindow.cpp
    #include "mainwindow.h"
    #include "ui_mainwindow.h"
    
    MainWindow::MainWindow(QWidget *parent) :
        QMainWindow(parent),
        ui(new Ui::MainWindow)
    {
        ui->setupUi(this);
    }
    
    MainWindow::~MainWindow()
    {
        delete ui;
    }
    
    MainWindow &MainWindow::instance(QWidget *parent)
    {
        static MainWindow mainWindow(parent);
        return mainWindow;
    }
    
    // Step 6
    // Callback in Qt thread
    void MainWindow::onReceiveMounted()
    {
        ui->plainTextEdit->appendPlainText(QLatin1String("MEDIA_MOUNTED"));
    }
    
    void MainWindow::onReceiveUnmounted()
    {
        ui->plainTextEdit->appendPlainText(QLatin1String("MEDIA_UNMOUNTED"));
    }
    

    Java-Qt_6

    MainWindow class is used just to add some text to our plainText control when it gets a notification. Calling these functions from Android thread might be very harmful to our application health – it might lead to crashes or unexpected behavior, so they MUST be called from Qt thread.

    Architecture diagram C/C++:

    This is the summary of C/C++ calls on our architecture diagram:

    Java-Qt_Qt_final

    Architecture diagram Java & C/C++:

    This is the summary of all the calls that we’ve done in C/C++ and in Java.

    Java-Qt_final

    Here you can download the example source code.

    Thank you for your time!

    The post Qt on Android Episode 7 appeared first on KDAB.

    Qt on Android: How to run C++ code on Android UI thread

    $
    0
    0

    I’d like to start a new series of Qt on Android articles, these will be small articles which will focus on useful features that you’ll need on Android but which don’t have any Qt API (yet).
    I’ll start with two pretty useful functions. These functions will help us to run C++ code directly on Android UI thread without writing any Java code. Qt 5.7 will bring will bring the same functionality.

    Until Qt 5.7 is out, we need to use our own implementation, let’s check the code:
    androidutils.h

    namespace KDAB {
    namespace Android {
    typedef std::function<void()> Runnable;
    
    /// Posts a runnable on Android thread, then exists.
    /// If you call runOnAndroidThread from Android UI thread,
    /// it will execute the runnable immediately
    void runOnAndroidThread(const Runnable &runnable);
    
    /// Posts a runnable on Android thread then waits until it's executed.
    void runOnAndroidThreadSync(const Runnable &runnable, int waitMs = INT_MAX);
    } // namespace Android
    } // KDAB
    

    I think the comments are more than enough to understand the code. Let’s check the implementation:
    androidutils.cpp

    namespace KDAB {
    namespace Android {
    
    static std::deque<Runnable> s_pendingRunnables;
    static std::mutex s_pendingRunnablesMutex;
    
    void runOnAndroidThread(const Runnable &runnable)
    {
        s_pendingRunnablesMutex.lock();
        bool triggerRun = s_pendingRunnables.empty();
        s_pendingRunnables.push_back(runnable);
        s_pendingRunnablesMutex.unlock();
        if (triggerRun) {
            QtAndroid::androidActivity().callMethod<void>("runOnUiThread",
                                                          "(Ljava/lang/Runnable;)V",
                                                          QAndroidJniObject("com/kdab/android/utils/Runnable").object());
        }
    }
    
    void runOnAndroidThreadSync(const Runnable &runnable, int waitMs)
    {
        std::shared_ptr<QSemaphore> sem = std::make_shared<QSemaphore>();
        runOnAndroidThread([sem, &runnable](){
            runnable();
            sem->release();
        });
        sem->tryAcquire(1, waitMs);
    }
    
    extern "C" JNIEXPORT void JNICALL Java_com_kdab_android_utils_Runnable_runPendingCppRunnables(JNIEnv */*env*/, jobject /*obj*/)
    {
        for (;;) { // run all posted runnables
            s_pendingRunnablesMutex.lock();
            if (s_pendingRunnables.empty()) {
                s_pendingRunnablesMutex.unlock();
                break;
            }
            Runnable runnable(std::move(s_pendingRunnables.front()));
            s_pendingRunnables.pop_front();
            s_pendingRunnablesMutex.unlock();
            runnable();
        }
    }
    
    } // namespace Android
    } // KDAB
    

    Let’s take a closer look at the source code:

    • runOnAndroidThread enqueues the runnable in s_pendingRunnables deque, and if it’s the only runnable in deque, it calls Activity.runOnUiThread with our custom Runnable (it’s source code is listed below). This runnable is picked up by Android UI event loop and is executed on Android UI thread. Our custom Runnable just calls runPendingCppRunnables native function. For more information Qt on Android thread, you need to check How to access and use Android Java API from your Qt on Android using JNI in a safe way article.
    • runOnAndroidThreadSync uses a semaphore to wait until the runnable is executed then exists.
    • Java_com_kdab_android_utils_Runnable_runPendingCppRunnables runs all pending C++ runnables on Android UI thread.

    And finally, let’s check our custom Runnable:
    Runnable.java

    package com.kdab.android.utils;
    class Runnable implements java.lang.Runnable
    {
        @Override
        public void run() {
            runPendingCppRunnables();
        }
        public static native void runPendingCppRunnables();
    }
    

    The implementation is very easy, the run function just calls runPendingCppRunnables native method which we’ll run all C++ runnables on Android UI thread.

    How to use these functions? Well, it’s pretty easy:

    First step is to add KDAB’s Android utils to your project.

    • clone KDAB’s Android repository ( $ git clone https://github.com/KDAB/android.git )
    • copy the contents of utils folder to your project (androidutils.cpp, androidutils.h and android folder)
    • add them to your project
      QT += androidextras
      
      SOURCES += androidutils.cpp
      HEADERS += androidutils.h
      
      ANDROID_PACKAGE_SOURCE_DIR = $$PWD/android
      

    Let’s create a Qt Button class (which just wraps an Android Button Java object).

    QAndroidJniObject m_button; // declared in your .h file
    
    // Implementation
    Button::Button
    {
        KDAB::Android::runOnAndroidThreadSync([this]{
            m_button = QAndroidJniObject("android/widget/Button", 
                                         "(Landroid/content/Context;)V",
                                         QtAndroid::androidActivity().object());
        });
    }
    

    We need to use runOnAndroidThreadSync to make sure m_button is initialized properly in our C++ constructor.
    Let’s check QAndroidJniObject parameters:

    Let’s set a property

    void Button::setText(const QString &text)
    {
        KDAB::Android::runOnAndroidThread([text, this]{
            m_button.callMethod<void>("setText", "(Ljava/lang/CharSequence;)V", 
                                      QAndroidJniObject::fromString(text).object());
        });
    }
    

    We don’t need to wait until the property is set, therefore we can use runOnAndroidThread in this case. Because runOnAndroidThread is asynchronous, we must copy all the captured values! Otherwise they will be invalid when the runnable is executed on Android UI thread.

    Let’s take a look to callMethod parameters:

    Let’s get a property

    QString Button::text() const
    {
        QString res;
        KDAB::Android::runOnAndroidThreadSync([&res, this]{
            res = m_button.callObjectMethod("getText", "()Ljava/lang/CharSequence;").toString();
        });
        return res;
    }
    

    Because runOnAndroidThreadSync waits, we can capture res variable by reference, this way we can safely set the value on Android UI thread and return it on Qt thread.

    Let’s check callObjectMethod parameters:

    • “getText” – is the method name
    • “()Ljava/lang/CharSequence;” – is the method signature

    .toString() converts a java string to a QString.

    You can download the source code from here : https://github.com/KDAB/android

    The post Qt on Android: How to run C++ code on Android UI thread appeared first on KDAB.

    Qt on Android: How to create a zero-copy Android SurfaceTexture QML item

    $
    0
    0

    Motivation:

    Android SurfaceTexture is used by all Android classes that need to display (a lot of) frames, it can be used to display media player, camera, etc. You can also use it in combination with other players: OpenMAX, VLC, etc. (well, VLC and other C++ player are using MediaCodec) to decode the images directly to our SurfaceTexture. As you can see it’s pretty useful.

    In this tutorial we’re going to see how easy it is to create a media player using this QML item and the Android’s Media player. We’re going to use Android’s MediaPlayer, to exercise our JNI skills ;-).

    Please create a simple Quick(Controls) Applications.

    Step I

    Add QtAndroidExtras module to your .pro file . We’re going to use QtAndroidExtras a lot.

    QT += androidextras
    

    Step II

    First let’s create a new class QAndroidMediaPlayer, which inherits QObject. Then, let’s create our MediaPlayer, in QAndroidMediaPlayer constructor

    qandroidmediaplayer.cpp

    QAndroidMediaPlayer::QAndroidMediaPlayer(QObject *parent)
        : QObject(parent)
        , m_mediaPlayer("android/media/MediaPlayer")
    {
    }
    

    m_mediaPlayer is declared as: QAndroidJniObject m_mediaPlayer

    In QAndroidMediaPlayer’s destructor we must call release method. Because we don’t know what state the m_mediaPlayer is in, before reset, we’re going to call stop and reset methods.

    QAndroidMediaPlayer::~QAndroidMediaPlayer()
    {
        QAndroidJniEnvironment env;
        m_mediaPlayer.callMethod<void>("stop");
        m_mediaPlayer.callMethod<void>("reset");
        m_mediaPlayer.callMethod<void>("release");
    }
    

    Next task is to implement a playFile Q_INVOKABLE method.

    void QAndroidMediaPlayer::playFile(const QString &file)
    {
        QAndroidJniEnvironment env;
        // m_mediaPlayer must be in idle state when calling
        // setDataSource, so we call stop and reset before.
    
        // try to stop the media player.
        m_mediaPlayer.callMethod<void>("stop");
    
        // try to reset the media player.
        m_mediaPlayer.callMethod<void>("reset");
    
        // set the path of the file
        m_mediaPlayer.callMethod<void>("setDataSource", "(Ljava/lang/String;)V",
                                       QAndroidJniObject::fromString(file).object());
    
        // prepare media player
        m_mediaPlayer.callMethod<void>("prepare");
    
        // start playing
        m_mediaPlayer.callMethod<void>("start");
    }
    

    At this moment we have a workable media player that can play any media files (supported by Android codecs). The only problem we have is that we don’t see any images when playing video files 🙂 . Let’s fix that problem!

    First and foremost, let’s add a new property to QAndroidMediaPlayer to set a new Surface to Android’s MediaPlayer object.

    void QAndroidMediaPlayer::setVideoOut(QSurfaceTexture *videoOut)
    {
        if (m_videoOut == videoOut)
            return;
        m_videoOut = videoOut;
    
        // Create a new Surface object from our SurfaceTexture
        QAndroidJniObject surface("android/view/Surface",
                                  "(Landroid/graphics/SurfaceTexture;)V",
                                   videoOut->surfaceTexture().object());
    
        // Set the new surface to m_mediaPlayer object
        m_mediaPlayer.callMethod<void>("setSurface", "(Landroid/view/Surface;)V",
                                       surface.object());
    
        emit videoOutChanged();
    }
    

    Step III

    Implement a QQuickItem which wraps a SurfaceTexture Android object. This item will be used to display the frames that are pushed into SurfaceTexture. Basically we rewrite Google’s MyGLSurfaceView.java in Qt.

    We start by creating a new class QSurfaceTexture which inherits QQuickItem and overwrites updatePaintNode method.

    Let’s see the header file:

    class QSurfaceTexture : public QQuickItem
    {
        Q_OBJECT
    public:
        QSurfaceTexture(QQuickItem *parent = nullptr);
        ~QSurfaceTexture();
    
        // returns surfaceTexture Java object.
        const QAndroidJniObject &surfaceTexture() const { return m_surfaceTexture; }
    
        // QQuickItem interface
    protected:
        QSGNode *updatePaintNode(QSGNode *n, UpdatePaintNodeData *) override;
    
    private:
        // our texture
        uint32_t m_textureId = 0;
    
        // Java SurfaceTexture object
        QAndroidJniObject m_surfaceTexture;
    };
    

    There’s no magic here, we need surfaceTexture member to access m_surfaceTexture (used by QAndroidMediaPlayer::setVideoOut), we also declare our m_textureId.

    Now, let’s see the implementation file:

    QSurfaceTexture::QSurfaceTexture(QQuickItem *parent)
        : QQuickItem(parent)
    {
        setFlags(ItemHasContents);
    }
    
    QSurfaceTexture::~QSurfaceTexture()
    {
        // Delete our texture
        if (m_textureId) {
            glBindTexture(GL_TEXTURE_EXTERNAL_OES, 0);
            glDeleteTextures(1, &m_textureId);
        }
    }
    

    We need to set ItemHasContents flag in constructor, and, in destructor, to delete the texture (if it was created).

    Now, let’s focus on updatePaintNode method.

    QSGNode *QSurfaceTexture::updatePaintNode(QSGNode *n, QQuickItem::UpdatePaintNodeData *)
    {
        SurfaceTextureNode *node = static_cast<SurfaceTextureNode *>(n);
        if (!node) {
            // Create texture
            glGenTextures(1, &m_textureId);
            glBindTexture(GL_TEXTURE_EXTERNAL_OES, m_textureId);
    
            // Can't do mipmapping with camera source
            glTexParameterf(GL_TEXTURE_EXTERNAL_OES, GL_TEXTURE_MIN_FILTER, GL_NEAREST);
            glTexParameterf(GL_TEXTURE_EXTERNAL_OES, GL_TEXTURE_MAG_FILTER, GL_LINEAR);
    
            // Clamp to edge is the only option
            glTexParameteri(GL_TEXTURE_EXTERNAL_OES, GL_TEXTURE_WRAP_S, GL_CLAMP_TO_EDGE);
            glTexParameteri(GL_TEXTURE_EXTERNAL_OES, GL_TEXTURE_WRAP_T, GL_CLAMP_TO_EDGE);
    
            // Create a SurfaceTexture Java object
            m_surfaceTexture = QAndroidJniObject("android/graphics/SurfaceTexture", "(I)V", m_textureId);
    
            // We need to setOnFrameAvailableListener, to be notify when a new frame was decoded
            // and is ready to be displayed. Check android/src/com/kdab/android/SurfaceTextureListener.java
            // file for implementation details.
            m_surfaceTexture.callMethod<void>("setOnFrameAvailableListener",
                                              "(Landroid/graphics/SurfaceTexture$OnFrameAvailableListener;)V",
                                              QAndroidJniObject("com/kdab/android/SurfaceTextureListener",
                                                                "(J)V", jlong(this)).object());
            // Create our SurfaceTextureNode
            node = new SurfaceTextureNode(m_surfaceTexture, m_textureId);
        }
    
        // flip vertical
        QRectF rect(boundingRect());
        float tmp = rect.top();
        rect.setTop(rect.bottom());
        rect.setBottom(tmp);
    
        QSGGeometry::updateTexturedRectGeometry(node->geometry(), rect, QRectF(0, 0, 1, 1));
        node->markDirty(QSGNode::DirtyGeometry | QSGNode::DirtyMaterial);
        return node;
    }
    

    We’ll check SurfaceTextureListener.java immediately. SurfaceTextureNode is a custom QSGGeometryNode, we’ll see its implementation after we’ll check SurfaceTextureListener.
    The rest of the comments should be enough to understand the code.

    Now let’s check SurfaceTextureListener.java.

    public class SurfaceTextureListener implements SurfaceTexture.OnFrameAvailableListener
    {
        private long m_callback = 0;
    
        public SurfaceTextureListener(long callback)
        {
            m_callback = callback;
        }
    
        @Override
        public void onFrameAvailable (SurfaceTexture surfaceTexture)
        {
            // call the native method
            frameAvailable(m_callback, surfaceTexture);
        }
    
        public native void frameAvailable(long nativeHandle, SurfaceTexture surfaceTexture);
    }
    

    You’ll need to add this file to your project in android/src/com/kdab/android folder. Also, make sure ANDROID_PACKAGE_SOURCE_DIR qmake variable is set to android sources folder.

    ...
    ANDROID_PACKAGE_SOURCE_DIR = $$PWD/android
    ...
    

    This class is needed to call a native function to signal when a new frame was decoded. Let’s check the C/C++ function implementation.

    extern "C" void Java_com_kdab_android_SurfaceTextureListener_frameAvailable(JNIEnv */*env*/, jobject /*thiz*/, jlong ptr, jobject /*surfaceTexture*/)
    {
        // a new frame was decoded, let's update our item
        QMetaObject::invokeMethod(reinterpret_cast<QSurfaceTexture*>(ptr), "update", Qt::QueuedConnection);
    }
    

    This function is called from decoder thread, therefore we’re using QMetaObject::invokeMethod to post a method call to update method on QSurfaceTexture’s thread.

    Next, let’s take a look to SurfaceTextureNode implementation. SurfaceTextureNode inherits QSGGeometryNode which is needed to render the texture content using the geometry and material. As you can see, the texture is not bound as a GL_TEXTURE_2D, but as GL_TEXTURE_EXTERNAL_OES (needed by Android MediaCodec/Player/Camera/etc.), so, we’ll need to use a shader to draw it (otherwise QSGSimpleTextureNode is more suitable to display textures).

    class SurfaceTextureNode : public QSGGeometryNode
    {
    public:
        SurfaceTextureNode(const QAndroidJniObject &surfaceTexture, GLuint textureId)
            : QSGGeometryNode()
            , m_surfaceTexture(surfaceTexture)
            , m_geometry(QSGGeometry::defaultAttributes_TexturedPoint2D(), 4)
            , m_textureId(textureId)
        {
            // we're going to use "preprocess" method to update the texture image
            // and to get the new matrix.
            setFlag(UsePreprocess);
    
            setGeometry(&m_geometry);
    
            // Create and set our SurfaceTextureShader
            QSGSimpleMaterial<State> *material = SurfaceTextureShader::createMaterial();
            material->setFlag(QSGMaterial::Blending, false);
            setMaterial(material);
            setFlag(OwnsMaterial);
    
            // We're going to get the transform matrix for every frame
            // so, let's create the array once
            QAndroidJniEnvironment env;
            jfloatArray array = env->NewFloatArray(16);
            m_uSTMatrixArray = jfloatArray(env->NewGlobalRef(array));
            env->DeleteLocalRef(array);
        }
    
        ~SurfaceTextureNode()
        {
            // delete the global reference, now the gc is free to free it
            QAndroidJniEnvironment()->DeleteGlobalRef(m_uSTMatrixArray);
        }
    
        // QSGNode interface
        void preprocess() override;
    
    private:
        QAndroidJniObject m_surfaceTexture;
        QSGGeometry m_geometry;
        jfloatArray m_uSTMatrixArray = nullptr;
        GLuint m_textureId;
    };
    
    void SurfaceTextureNode::preprocess()
    {
        QSGSimpleMaterial<State> *mat = static_cast<QSGSimpleMaterial<State> *>(material());
        if (!mat)
            return;
    
        // update the texture content
        m_surfaceTexture.callMethod<void>("updateTexImage");
    
        // get the new texture transform matrix
        m_surfaceTexture.callMethod<void>("getTransformMatrix", "([F)V", m_uSTMatrixArray);
        QAndroidJniEnvironment env;
        env->GetFloatArrayRegion(m_uSTMatrixArray, 0, 16, mat->state()->uSTMatrix.data());
    
        // Activate and bind our texture
        glActiveTexture(GL_TEXTURE0);
        glBindTexture(GL_TEXTURE_EXTERNAL_OES, m_textureId);
    }
    

    This class creates and sets our SurfaceTextureShader (the material), then on every frame it updates the texture image and gets its transform matrix.

    Next let’s check SurfaceTextureShader class and State structure. SurfaceTextureShader is based on QSGSimpleMaterialShader

    struct State {
        // the texture transform matrix
        QMatrix4x4 uSTMatrix;
    
        int compare(const State *other) const
        {
            return uSTMatrix == other->uSTMatrix ? 0 : -1;
        }
    };
    

    In this structure, we only need the texture transform matrix. This matrix is updated by SurfaceTextureNode::preprocess method and used, below, by SurfaceTextureShader::updateState method.

    class SurfaceTextureShader : QSGSimpleMaterialShader<State>
    {
        QSG_DECLARE_SIMPLE_COMPARABLE_SHADER(SurfaceTextureShader, State)
    public:
    
        // vertex & fragment shaders are shamelessly "stolen" from MyGLSurfaceView.java 🙂
        const char *vertexShader() const {
            return
                    "uniform mat4 qt_Matrix;                            \n"
                    "uniform mat4 uSTMatrix;                            \n"
                    "attribute vec4 aPosition;                          \n"
                    "attribute vec4 aTextureCoord;                      \n"
                    "varying vec2 vTextureCoord;                        \n"
                    "void main() {                                      \n"
                    "  gl_Position = qt_Matrix * aPosition;             \n"
                    "  vTextureCoord = (uSTMatrix * aTextureCoord).xy;  \n"
                    "}";
        }
    
        const char *fragmentShader() const {
            return
                    "#extension GL_OES_EGL_image_external : require                     \n"
                    "precision mediump float;                                           \n"
                    "varying vec2 vTextureCoord;                                        \n"
                    "uniform lowp float qt_Opacity;                                     \n"
                    "uniform samplerExternalOES sTexture;                               \n"
                    "void main() {                                                      \n"
                    "  gl_FragColor = texture2D(sTexture, vTextureCoord) * qt_Opacity;  \n"
                    "}";
        }
    
        QList<QByteArray> attributes() const
        {
            return QList<QByteArray>() << "aPosition" << "aTextureCoord";
        }
    
        void updateState(const State *state, const State *)
        {
            program()->setUniformValue(m_uSTMatrixLoc, state->uSTMatrix);
        }
    
        void resolveUniforms()
        {
            m_uSTMatrixLoc = program()->uniformLocation("uSTMatrix");
            program()->setUniformValue("sTexture", 0); // we need to set the texture once
        }
    
    private:
        int m_uSTMatrixLoc;
    };
    

    In SurfaceTextureShader we have (almost) the same vertex & fragment shaders as in MyGLSurfaceView.java, the only difference is the qt shader vars (qt_Matrix and qt_Opacity).

    Step IV

    Put everything together and enjoy our MediaPlayer!

    The main.cpp changes

    int main(int argc, char *argv[])
    {
        QGuiApplication app(argc, argv);
    
        // Register our QML type
        qmlRegisterType<QSurfaceTexture>("com.kdab.android", 1, 0, "SurfaceTexture");
    
        // Create a player
        QAndroidMediaPlayer player;
    
        QQmlApplicationEngine engine;
    
        // Set the player
        engine.rootContext()->setContextProperty("_mediaPlayer", &player);
    
        engine.load(QUrl(QStringLiteral("qrc:/main.qml")));
        return app.exec();
    }
    

    The QML code

    import QtQuick 2.5
    import QtQuick.Controls 1.4
    import com.kdab.android 1.0
    
    ApplicationWindow {
        visible: true
        width: 640
        height: 480
        title: qsTr("SurfaceTexture example")
    
        SurfaceTexture {
            id: videoItem
            anchors.fill: parent
    
            // Set media player's video out
            Component.onCompleted: _mediaPlayer.videoOut = videoItem;
    
            MouseArea {
                anchors.fill: parent
                onClicked: _mediaPlayer.playFile("/sdcard/testfile.mp4");
            }
        }
    }
    

    As you can see, the path to file is hard-coded, so make sure you push a video file to /sdcard/testfile.mp4, or change that value.

    Last thing we need to do is to set min API version on your AndroidManifest.xml file to 14, because the needed Surface constructor was added in API 14.

    Now, the only thing we need to do, is to tap on the screen to play that video file!

    You can find the full source code of this article here: https://github.com/KDAB/android

    The post Qt on Android: How to create a zero-copy Android SurfaceTexture QML item appeared first on KDAB.

    Qt on Android: How to convert Qt images to Android Images and vice-versa

    $
    0
    0

    Sometimes we need to exchange images from Android world to Qt world and vice-versa, therefore in this article we’re going to see how to convert a QImage to an Android Bitmap and how to convert an Android bitmap and an Android Drawable into a QImage.

    To get access to Android Bitmap data & info we’re going to use NDK’s support, so we need to make sure jnigraphics library is in libraries dependency in our .pro file:

    LIBS += -ljnigraphics
    

    Now let’s see what the convert functions looks like:

    #include <QAndroidJniEnvironment>
    #include <QAndroidJniObject>
    #include <android/bitmap.h>
    
    QImage toImage(const QAndroidJniObject &bitmap)
    {
        QAndroidJniEnvironment env;
        AndroidBitmapInfo info;
        if (AndroidBitmap_getInfo(env, bitmap.object(), &info) != ANDROID_BITMAP_RESULT_SUCCESS)
            return QImage();
    
        QImage::Format format;
        switch (info.format) {
        case ANDROID_BITMAP_FORMAT_RGBA_8888:
            format = QImage::Format_RGBA8888;
            break;
        case ANDROID_BITMAP_FORMAT_RGB_565:
            format = QImage::Format_RGB16;
            break;
        case ANDROID_BITMAP_FORMAT_RGBA_4444:
            format = QImage::Format_ARGB4444_Premultiplied;
            break;
        case ANDROID_BITMAP_FORMAT_A_8:
            format = QImage::Format_Alpha8;
            break;
        default:
            return QImage();
        }
    
        void *pixels;
        if (AndroidBitmap_lockPixels(env, bitmap.object(), &pixels) != ANDROID_BITMAP_RESULT_SUCCESS)
            return QImage();
    
        QImage image(info.width, info.height, format);
    
        if (info.stride == uint32_t(image.bytesPerLine())) {
            memcpy((void*)image.constBits(), pixels, info.stride * info.height);
        } else {
            uchar *bmpPtr = static_cast<uchar *>(pixels);
            const unsigned width = std::min(info.width, (uint)image.width());
            const unsigned height = std::min(info.height, (uint)image.height());
            for (unsigned y = 0; y < height; y++, bmpPtr += info.stride)
                memcpy((void*)image.constScanLine(y), bmpPtr, width);
        }
    
        if (AndroidBitmap_unlockPixels(env, bitmap.object()) != ANDROID_BITMAP_RESULT_SUCCESS)
            return QImage();
    
        return image;
    }
    

    This function doesn’t have any JNI magic, and it’s quite simple. We try to find the best QImage::Format (To be honest I’m not very sure about ANDROID_BITMAP_FORMAT_RGBA_4444), then we copy the image data from Android bitmap to our QImage.

    Being able to convert any Android Drawable to a QImage is quite useful, therefore, let’s check how to “convert” (actually draw) an Android drawable into a QImage.

    QAndroidJniObject createBitmap(int width, int height)
    {
        QAndroidJniObject config = QAndroidJniObject::getStaticObjectField("android/graphics/Bitmap$Config",
                                                                           "ARGB_8888",
                                                                           "Landroid/graphics/Bitmap$Config;");
    
        return QAndroidJniObject::callStaticObjectMethod("android/graphics/Bitmap",
                                                         "createBitmap",
                                                         "(IILandroid/graphics/Bitmap$Config;)Landroid/graphics/Bitmap;",
                                                         width, height, config.object());
    }
    
    QImage toImage(const QAndroidJniObject &drawable, const QRect &bounds)
    {
        QAndroidJniObject bitmap = createBitmap(bounds.width(), bounds.height());
        QAndroidJniObject canvas("android/graphics/Canvas", "(Landroid/graphics/Bitmap;)V", bitmap.object());
        drawable.callMethod<void>("setBounds", "(IIII)V", bounds.left(), bounds.top(), bounds.right(), bounds.bottom());
        drawable.callMethod<void>("draw", "(Landroid/graphics/Canvas;)V", canvas.object());
        return toImage(bitmap);
    }
    

    First function (createBitmap) is used to create an RGBA_32 bitmap, we’re going to use this function in the next snippet too. Second function (toImage) draws the drawable into a bitmap canvas, then it converts the bitmap using previous toImage function.

    Finally, let’s see how to convert a QImage to an Android Bitmap

    QAndroidJniObject toAndroidBitmap(const QImage &img)
    {
        QImage image = img.format() == QImage::Format_RGBA8888 ? img : img.convertToFormat(QImage::Format_RGBA8888);
        QAndroidJniObject bitmap = createBitmap(img.width(), img.height());
        QAndroidJniEnvironment env;
        AndroidBitmapInfo info;
        if (AndroidBitmap_getInfo(env, bitmap.object(), &info) != ANDROID_BITMAP_RESULT_SUCCESS)
            return QAndroidJniObject();
    
        if (info.format!= ANDROID_BITMAP_FORMAT_RGBA_8888)
            return QAndroidJniObject();
    
        void *pixels;
        if (AndroidBitmap_lockPixels(env, bitmap.object(), &pixels) != ANDROID_BITMAP_RESULT_SUCCESS)
            return QAndroidJniObject();
    
        if (info.stride == uint32_t(image.bytesPerLine())) {
            memcpy(pixels, image.constBits(), info.stride * info.height);
        } else {
            uchar *bmpPtr = static_cast<uchar *>(pixels);
            const unsigned width = std::min(info.width, (uint)image.width());
            const unsigned height = std::min(info.height, (uint)image.height());
            for (unsigned y = 0; y < height; y++, bmpPtr += info.stride)
                memcpy(bmpPtr, image.constScanLine(y), width);
        }
    
        if (AndroidBitmap_unlockPixels(env, bitmap.object()) != ANDROID_BITMAP_RESULT_SUCCESS)
            return QAndroidJniObject();
    
        return bitmap;
    }
    

    This function is quite simple, we’re using createBitmap from a previous snippet to create an Android Bitmap object, then we copy the QImage content to Android Bitmap.

    The post Qt on Android: How to convert Qt images to Android Images and vice-versa appeared first on KDAB.

    Qt on Android: How to use Android Toast

    $
    0
    0

    To get you started on this, we’ll be using KDAB’s Android utils with the humble Toast. Toasts are small popups which are used to show the user some feedback. Check Google’s API guide for more info about toasts.

    The easiest way to show a toast is to use Toast.makeText(Context context, CharSequence text, int duration) static method. This method needs 3 params:

    • the context (we’ll use the activity)
    • the text to show
    • and the duration: one of LENGTH_SHORT (0) and LENGTH_LONG (1).

    Then we just need to call the show method.

    Of course all the calls MUST happen on the Android UI thread.

    As usual we’re going to make use (abuse) of QtAndroidExtras and KDAB’s Android utils (check this article to see how to add them to your project).

    Let’s create a simple function to show the toast:

    enum Duration {
        SHORT = 0,
        LONG = 1
    };
    
    void showToast(const QString &message, Duration duration = LONG) {
        // all the magic must happen on Android UI thread
        KDAB::Android::runOnAndroidThread([message, duration] {
            QAndroidJniObject javaString = QAndroidJniObject::fromString(message);
            QAndroidJniObject toast = QAndroidJniObject::callStaticObjectMethod("android/widget/Toast", "makeText",
                                                                                "(Landroid/content/Context;Ljava/lang/CharSequence;I)Landroid/widget/Toast;",
                                                                                QtAndroid::androidActivity().object(),
                                                                                javaString.object(),
                                                                                jint(duration));
            toast.callMethod<void>("show");
        });
    }
    

    Yep, it’s that simple!

    Now let’s take a closer look at the code:

    • We’re using KDAB::Android::runOnAndroidThread to run everything on the Android UI thread.
    • We’re capturing message and duration params as values not as references, because as we’ve seen in a previous article KDAB::Android::runOnAndroidThread is (most of the time) asynchronous.
    • We’re using QAndroidJniObject::fromString to convert a QString to a QAndroidJniObject string object.
    • We’re using QAndroidJniObject::callStaticObjectMethod to call the makeText static method that returns a Toast java object. We need to pass the following parameters:
      • “android/widget/Toast” is the fully qualified class name.
      • “makeText” is the static method name
      • “(Landroid/content/Context;Ljava/lang/CharSequence;I)Landroid/widget/Toast;” – is the method signature. The method returns Landroid/widget/Toast; object and expects 3 arguments:
        • Landroid/content/Context; – a Content object
        • Ljava/lang/CharSequence; – a CharSequence object
        • I – an int
      • QtAndroid::androidActivity().object(), javaString.object(), jint(duration) are the makeText arguments.
    • after we get the toast object, we call show method and we’re done.

    Enjoy!

    showToast(QLatin1String("Hello from Qt"));
    

    The post Qt on Android: How to use Android Toast appeared first on KDAB.

    Qt on Android: How to restart your application

    $
    0
    0

    Some time ago, I wrote a code to restart the running application on Android.

    You might well ask why such a thing was needed. It was needed because there are cases where, whenever a user changes the theme, the application has to restart to apply the change (it can’t be applied on the fly). In my example I used it to restart Qt Quick Controls 2 gallery.

    Sadly my fix was not accepted, because other platforms (iOS, IIRC) have this missing feature too, so it was decided to remove Android code so it didn’t stand out.

    Anyway, because I think this piece of code might help other people, I’m going to share it with you today.

    Our goal is to use AlarmManager.set() method to set an alarm (a PendingIntent) that will start our application in the near future (in our case 100ms from now), then quits the application. When the alarm timeouts it will start our application. Be aware that the AlarmManager is anything but accurate, so it might take more than 100ms to restart the application (in some cases it takes up to 5s to restart it).

    Here is the code that does all the magic:

    auto activity = QtAndroid::androidActivity();
    auto packageManager = activity.callObjectMethod("getPackageManager",
                                                    "()Landroid/content/pm/PackageManager;");
    
    auto activityIntent = packageManager.callObjectMethod("getLaunchIntentForPackage",
                                                          "(Ljava/lang/String;)Landroid/content/Intent;",
                                                          activity.callObjectMethod("getPackageName",
                                                          "()Ljava/lang/String;").object());
    
    auto pendingIntent = QAndroidJniObject::callStaticObjectMethod("android/app/PendingIntent", "getActivity",
                                                                   "(Landroid/content/Context;ILandroid/content/Intent;I)Landroid/app/PendingIntent;",
                                                                   activity.object(), jint(0), activityIntent.object(),
                                                                   QAndroidJniObject::getStaticField<jint>("android/content/Intent",
                                                                                                           "FLAG_ACTIVITY_CLEAR_TOP"));
    
    auto alarmManager = activity.callObjectMethod("getSystemService",
                                                  "(Ljava/lang/String;)Ljava/lang/Object;",
                                                  QAndroidJniObject::getStaticObjectField("android/content/Context",
                                                                                          "ALARM_SERVICE",
                                                                                          "Ljava/lang/String;").object());
    
    alarmManager.callMethod<void>("set",
                                  "(IJLandroid/app/PendingIntent;)V",
                                  QAndroidJniObject::getStaticField<jint>("android/app/AlarmManager", "RTC"),
                                  jlong(QDateTime::currentMSecsSinceEpoch() + 100), pendingIntent.object());
    
    qApp->quit();
    

    Let’s have a closer look to the code:

    • 1st line gets the activity packageManager object.
    • 2nd line gets an activityIntent object using the packageManager. getPackageName() method returns the name of this application’s package name.
    • 3rd line gets a pendingIntent needed to restart our application.
    • 4th line gets the alarmManager
    • 5th line sets the pendingIntent to start 100 milliseconds from now.
    • 6th line quits the application

    The post Qt on Android: How to restart your application appeared first on KDAB.


    Qt on Android: How to create an Android service using Qt

    $
    0
    0

    Starting with Qt 5.7, we added the ability to create Android services using Qt.
    In this article we’re going to see how to get started and also how to communicate between the two.

    Before we get started I want to add a big bold WARNING about the performance! Because the services are run in the background for a very long time, make sure your service doesn’t drain the device battery!

    Getting started

    Step I: Extend QtService

    Every single Qt Android Service must have its own Service java class which extends QtService, so the first step is to create such a service:

    // java file goes in android/src/com/kdab/training/MyService.java
    package com.kdab.training;
    import org.qtproject.qt5.android.bindings.QtService;
    
    public class MyService extends QtService
    {
    }
    

    Step II: Add the service section(s) to your AndroidManifest.xml file

    The next step is to add the service section(s) to your AndroidManifest.xml file. To do that you first need to copy & paste the template from https://wiki.qt.io/AndroidServices to your AndroidManifest.xml file, then set android:name attribute with your service class name, as shown in the following snippet:

    <application ... >
      <!-- .... -->
      <service android:process=":qt" android:name=".MyService">
      <!-- android:process=":qt" is needed to force the service to run on a separate
                                                            process than the Activity -->
    
        <!-- .... -->
    
        <!-- Background running -->
        <meta-data android:name="android.app.background_running" android:value="true"/>
        <!-- Background running -->
      </service>
      <!-- .... -->
    </application>
    

    BE AWARE: Every single Qt service/activity MUST run in it’s own process! Therefore for each service you must set a different android:process attribute value.

    Step III: How to start the service ?

    Now you need to decide how to start the service. There are two ways to do it:

    • on demand
    • at boot time

    We’re going to check them both:

    Start the service on demand

    This is the most common way to start your service(s). To start the service you just need to call Context.startService(Intent intent) method.
    The easiest way is to add a static method to your MyService:

    // java file goes in android/src/com/kdab/training/MyService.java
    package com.kdab.training;
    
    import android.content.Context;
    import android.content.Intent;
    import org.qtproject.qt5.android.bindings.QtService;
    
    public class MyService extends QtService
    {
        public static void startMyService(Context ctx) {
            ctx.startService(new Intent(ctx, MyService.class));
        }
    }
    

    Then simply call it from Qt to start it:

    QAndroidJniObject::callStaticMethod<void>("com/kdab/training/MyService",
                                                  "startMyService",
                                                  "(Landroid/content/Context;)V",
                                                  QtAndroid::androidActivity().object());
    

    Start the service at boot time

    This method is used quite seldom and is useful ONLY when you really need to run the service at boot time, otherwise I do recommend you to start it on demand.

    First you need to add android.permission.RECEIVE_BOOT_COMPLETED permission to your AndroidManifest.xml file:

    <application ... >
    
      <!-- .... -->
      <uses-permission android:name="android.permission.RECEIVE_BOOT_COMPLETED" />
    </application>
    

    Then you need to add a receiver element to your AndroidManifest.xml file:

    <application ... >
        <!-- .... -->
        <receiver android:name=".MyBroadcastReceiver">
            <intent-filter>
                <action android:name="android.intent.action.BOOT_COMPLETED" />
            </intent-filter>
        </receiver>
        <!-- .... -->
    </application>
    

    And finally, you need to implement MyBroadcastReceiver class, as shown in the following snippet:

    public class MyBroadcastReceiver extends BroadcastReceiver {
        @Override
        public void onReceive(Context context, Intent intent) {
            Intent startServiceIntent = new Intent(context, MyService.class);
            context.startService(startServiceIntent);
        }
    }
    

    Step IV: Where to put your Qt Service code?

    Next you need to decide where you’re going to put your service code. Qt (and qmake) has two options for you:

    • in the same .so file with the application
    • in a separate .so file

    We’re going to check them both:

    Same .so for app & service(s)

    Because you’ll have one big .so file, you need a way to know when it will run as an activity or as a service. To do that you just need pass some arguments to your main function. AndroidManifest.xml allows you to easily do that:

    <service ... >
        <!-- ... -->
        <!-- Application arguments -->
        <meta-data android:name="android.app.arguments" android:value="-service"/>
        <!-- Application arguments -->
        <!-- ... -->
    </service>
    

    Then make sure you set the same android.app.lib_name metadata for both service(s) & activity elements:

    <service ... >
        <!-- ... -->
        <meta-data android:name="android.app.lib_name"
                    android:value="-- %%INSERT_APP_LIB_NAME%% --"/>
        <!-- ... -->
    </service>
    

    I recommend you to use this method only if your activity and your service(s) share a large piece of code.

    Separate .so files for app & service(s)

    The second option is to create separate .so files for your app & service(s).
    First you need to create a separate server .pro file(s):

    TEMPLATE = lib
    TARGET = server
    CONFIG += dll
    QT += core
    SOURCES += \
        server.cpp
    

    The server .so main entry is the main function:

    #include <QDebug>
    
    int main(int argc, char *argv[])
    {
        qDebug() << "Hello from service";
        return 0
    }
    

    Last you need to load the server .so file:

    <service ... >
        <!-- ... -->
        <meta-data android:name="android.app.lib_name" android:value="server"/>
        <!-- ... -->
    </service>
    

    Use QtRemoteObject for communication

    We’ve seen how to create and how to start a Qt on Android service, now let’s see how to do the communication between them.
    There are lots of solutions out there, but for any Qt project, I do recommend you use QtRemoteObject, because it will make your life so easy!

    QtRemoteObjects is a playground Qt module led by Ford, for object remoting between processes/devices:

    • exports QObjects remotely (properties, signals & slots)
    • exports QAbstractItemModels remotely
    • creates a replicant on the client side you can interface with
    • repc generates source & replica (server & client) source files from .rep files
      • .rep file is the QtRemoteObjects IDL (interface description language)

    As you can see it’s very Qt specific!
    Let’s see how to add it to your projects and use it.

    Get QtRemoteObjects

    QtRemoteObjects project is located at http://code.qt.io/cgit/playground/qtremoteobjects.git/, to get it you need to run the following commands:

    $ git clone git://code.qt.io/playground/qtremoteobjects.git
    $ cd qtremoteobjects
    $ ~/Qt/5.7/android_armv7/bin/qmake -r && make && make install
    

    If needed, replace ~/Qt/5.7/android_armv7 with your Qt version and android ABI of choice.

    Use QtRemoteObjects

    Using QtRemoteObjects is pretty easy, you need to do a few easy steps:

    – add QtRemoteObjects to your .pro files

    # ...
    QT += remoteobjects
    # ...
    

    – create .rep file(s)

    class PingPong {
        SLOT(void ping(const QString &msg));
        SIGNAL(pong(const QString &msg));
    }
    

    – add .rep file(s) to the server .pro file

    # ...
    REPC_SOURCE += pingpong.rep
    # ...
    

    – add .rep file(s) to the client .pro file

    # ...
    REPC_REPLICA += pingpong.rep
    # ...
    

    – QtRemoteObjects source(server) side implementation

    #include <QCoreApplication>
    #include "rep_pingpong_source.h"
    
    class PingPong : public PingPongSource {
    public slots:
        // PingPongSource interface
        void ping(const QString &msg) override {
            emit pong(msg + " from server");
        }
    };
    
    int main(int argc, char *argv[])
    {
        QCoreApplication app(argc, argv);
    
        QRemoteObjectHost srcNode(QUrl(QStringLiteral("local:replica")));
        PingPong pingPongServer;
        srcNode.enableRemoting(&pingPongServer);
    
        return app.exec();
    }
    

    Let’s check the code a little bit.
    First you need to implement all .rep interfaces (PingPongSource), then export PingPong object using enableRemoting.

    – QtRemoteObjects replica(client) side implementation

    #include "rep_pingpong_replica.h"
    
    // ....
        QRemoteObjectNode repNode;
        repNode.connectToNode(QUrl(QStringLiteral("local:replica")));
        QSharedPointer<PingPongReplica> rep(repNode.acquire<PingPongReplica>());
        bool res = rep->waitForSource();
        Q_ASSERT(res);
        QObject::connect(rep.data(), &PingPongReplica::pong, [](const QString &msg){
            qDebug() << msg;
        });
        rep->ping("Hello");
    // ....
    

    Let’s check the code:

    • use QRemoteObjectNode to connect to QRemoteObjectHost
    • use QRemoteObjectNode:acquire to link the local object to the remote one
    • use the acquired object as its local (call slots, connect to signals, etc.)

    As you can see, using Qt + QtRemoteObject is (much?) easier and more straight forward than Android’s Java services + AIDL 😉

    Limitations

    • the activities & service(s) must run on a different process.
    • it is not possible (yet) to use QtCreator to easily add a service section to your AndroidManifest.xml file check QTCREATORBUG-16884
    • it is not possible (yet) to use QtCreator to easily generate a service subproject for us, check QTCREATORBUG-16885
    • it is not possible (yet) to see the services logs in QtCreator. You’ll need to use
       $ adb logcat 

      to see it, check QTCREATORBUG-16887

    • it is not possible (yet (hopefully)) to debug the services in QtCreator. This feature will take some time to implement it, therefore I’ll not hold my breath for it, check QTCREATORBUG-16886

    Please use the above bug report links to vote for your favorite tasks, the ones that have more votes (usually) are implemented first!

    You can find the full source code of this article here: https://github.com/KDAB/android

    The post Qt on Android: How to create an Android service using Qt appeared first on KDAB.

    “Unboxing” the Android Things Developer Preview

    $
    0
    0

    Android Things is Google’s answer to creating an environment for IoT devices. Take a slimmed down Android build, add some sensor-specific APIs, and provide it on a number of powerful pre-integrated micro-boards and you have a ready-made platform for building a host of upcoming IoT devices. Android Things can take advantage of many existing Android libraries, toolkits, and APIs, making it easier and quicker for developers to turn ideas into product. What’s not to like?

    We decided to test this theory by checking out the Android Things Developer Preview on a Raspberry Pi 3. We were looking to assess the overall experience, to understand what types of products it is targeting and to try to determine how well it can support Qt.

    Raspberry Pi 3 (Model B)

    One of my very first observations is that Google does not provide the source, just a pre-built image. This makes it difficult to customize the image and puts us at the mercy of Google for updates to any of the contained components or packages like the kernel or SSL library. Let’s hope that this will change once we’re beyond the Developer Preview stage.

    Once you have the image loaded onto a board, it’s time to boot it and take it for a spin. This is an appropriate time to get a coffee — and you’ve got the time to drive to Starbucks — because booting Android Things takes a very long time. Linux builds for Yocto or Debian on the same hardware boot significantly faster than Android Things, so we can probably assume the boot process hasn’t yet been fine-tuned. Without knowing the final boot speed of an Android Things product, you may want to plan use cases around a system that’s always on and rarely needs a reboot, or that isn’t real-time and can afford a boot process that takes minutes.

    The Android Things Preview on the Raspberry Pi 3 doesn’t provide OpenGL ES support or a virtual keyboard, which severely limits what type of Android Java apps will run. (Unfortunately, that also means it cannot support Qt QML either.) It’s pretty safe to say that if your device plans to have a full smartphone-like display, you might not want to use Android Things anyway. Although it does support frame buffer graphics, without hardware acceleration the graphics are quite pokey. Our guess is that even if Android Things will eventually support OpenGL ES, its best application will be for a headless configuration or one where your display needs aren’t too sophisticated.

    Unfortunately, boot speed and graphics aren’t the only things that are sluggish. Running and installing apps are quite slow: first time loads for a Java app are around 20 seconds, and for a Qt app around 25 seconds. This delay is likely due to the AOT compiler, because things speed up dramatically to a boot in just 2-3 seconds on subsequent loads. While this is a pain for developers who will suffer these load times for each new build, the AOT compiling means that customers would only notice a slow experience first time out-of-the-box.

    Now for the good news. Qt developers will be happy to know that Qt Creator works very well with Android Things — running and debugging apps just works. And not only will QWidget-based applications run on Android Things, they’re even faster than the platform’s native Android Java widgets. This may not be saying much without GPU-accelerated graphics but any speed improvement is a bonus.

    Also good news is the device’s security. Android Things uses the Android security/permissions model across the board, letting you have complete security control of your IoT device access, and placing all apps in isolated containers by default. With IoT security being a primary concern, built-in security from the ground up is most welcome.

    Finally, Android Things is Apache 2 licensed. People who are building an IoT device to be sold as a product will appreciate that they don’t have to open up their source code to the world. It is a disadvantage to those who are tinkering but this choice (and the Google source ownership) pretty clearly point to a commercial product bias.

    Conclusion

    Android Things

    If you’re an Android fan, you’ll like where Android Things is going. It’s a bit on the slow side, as it’s clearly designed with certain use cases in mind — like little (or no) display and infrequent reboots — but the benefits of Android development may outweigh the disadvantage of carrying around a massive Android runtime. It will definitely suffer on low-end devices but we can hope that optimizations will be made as more programmers get their hands on it. We’ll certainly be keeping our eyes on it and, as running C++ can do nothing but help the overall speed, we’ll be trying to make sure that it supports Qt as best as possible.

    The post “Unboxing” the Android Things Developer Preview appeared first on KDAB.

    Perfect Debugging Experience with QtCreator on Android

    $
    0
    0

    While I was working on a yet-to-be-announced super secret and cool Qt on Android project, I had to do a lot of debugging. This way I found that debugging Qt apps on Android using QtCreator was ok, but it had some issues, which was kinda frustrating.

    • First issue was that I could not debug on an Android 8 device.
    • Second issue was that, even if the debugger was almost ok for debugging Qt apps, debugging Qt itself was not that good.

    Long story short, these problems will be fixed starting with QtCreator 4.6.1 (was too late for 4.6.0) or 4.7, and I also paved the way for using lldb if necessary, though, gdb works perfectly for me. And in the (distant) future MAYBE even being able to do java debugging from QtCreator as well!

    Keep reading if you are interested in technical details.

    How the debugging worked until now: it used a handshake technique:

    • The application built for debugging bundles gdbserver into the apk.
    • We start the application from QtC with some special params.
    • The app checks these params, it starts gdbserver, it creates a socket, then it waits for QtCreator to connect to this socket.
    • QtCreator uses adb to forward gdbservers and the socket port to your host.
    • QtCreator tries to connect to the socket created by your application. When it succeeds to connect to that socket it attaches host gdb to gdbserver. At this moment all the application’s .so files are loaded and gdb will search for their symbols on the host side. It sets the breakpoints.
    • At the end it signals the java application (using the previous socket) that it can continue the execution.

    How it works now: it’s using the same technique that Android Studio uses:

    • The application built for debugging bundles gdbserver into the apk.
    • The application is started in debug mode (we add “-D” param to adb shell am start).
    • The default wait for debugger dialog appears which waits for a jdb connection.
    • QtCreator uses “adb shell run-as” to search for gdbserver and it starts it.
    • QtCreator uses adb to forward gdbservers and the socket port to your host. At this moment no .so files are loaded by your application.
    • QtCreator connects to gdbserver.
    • QtCreator uses jdb to attach to the java debugger and it signals the application to continue the execution.

    At first glance, both ways look similar, but …. there is a big difference 🙂

    • First and foremost the application doesn’t need the handshake hack, this means that we can soon drop that code from Android Qt apps.
    • The second difference, which makes the debugging perfect, is at the point when we attach gdbserver to the application. As you can see, in the first way we attach gdbserver to the application after we load all .so file, this means that all breakpoints to static vars constructors or to JNI_Onload will not work, because these functions are already called by the linker.
    • Now, because QtCreator is in control of the gdbserver part, with some effort it can search for lldbserver instead, and start it.
    • Last but not least, because it’s using jdb to start the application, it might be possible to use it also to debug the java part of the application!

    The downside of the new way is that the start up is a little bit slower, because instead of loading the symbols for all the .so files at once, it will load them one by one as they are loaded by the application, which on my Ryzen 1700X is from 2 to 5 seconds slower.

    If you can’t wait for QtCreator 4.6.1/4.7 you can cherry-pick the following two patches and rebuild QtCreator yourself:

    In the end I want to thank The Qt Company folks who helped me in testing these patches on all platforms and on as many devices as we had!


    About KDAB

    KDAB is a consulting company offering a wide variety of expert services in Qt, C++ and 3D/OpenGL and providing training courses in:

    KDAB believes that it is critical for our business to contribute to the Qt framework and C++ thinking, to keep pushing these technologies forward to ensure they remain competitive.

    The post Perfect Debugging Experience with QtCreator on Android appeared first on KDAB.

    QtCreator CMake for Android plugin

    $
    0
    0

    Santa Claus is coming to … wait a minute, it’s not Christmas yet!

    I have the pleasure to let you know that KDAB has contributed to Qt with yet another super cool project! It’s about QtCreator CMake for Android! I know it’s a strange coincidence between this article and The Qt Company’s decision to ditch QBS and use CMake for Qt 6, but I swear I started to work on this project *before* they announced it 🙂 ! This plugin enables painless experience when you want to create Android apps using Qt, CMake and QtCreator. It’s almost as easy as Android Qmake QtCreator plugin! The user will build, run & debug Qt on Android Apps as easy as it does with Qmake. Before I go into the boring details, let’s see what the requirements are and, more importantly, when it will be available! Requirements:

    • cmake 3.7 or newer (needed for server support in QtCreator)
    • NDKr18 or newer (only Clang and libc++ shared are supported)
    • Qt 5.12.1 (was too late for this patch to get in 5.12.0)

    When will it be available? Well, I started the blog with the Santa on purpose, because, sadly, it’s too late to push it in QtCreator 4.8 and it will be available in the next version (4.9). If you can’t wait for QtCreator 4.9 and you like to try it sooner, you can apply this patch on top of QtCreator’s master branch. Now back to technical details, in order to build your Qt Android application, this plugin must do some magic:

    • after it builds the C++ bits, it copies all the targets (DynamicLibraries) into “{build_folder}/android/libs/{arch}”
    • generates android_deployment_settings.json, which is needed by androiddeployqt tool

    After this step, androiddeployqt will complete your Android Qt APK by copying all the Qt dependencies (libs & resources). Last but not least, these are qmake features that you’ll not find in cmake:

    • IDE management for ANDROID_PACKAGE_SOURCE_DIR yes, it supports even the same naming as qmake. You’ll need to add the following piece of cmake script to your CMakeLists.txt file:
      if(ANDROID)
          set(ANDROID_PACKAGE_SOURCE_DIR &quot;${CMAKE_CURRENT_SOURCE_DIR}/android&quot; CACHE INTERNAL &quot;&quot;)
      endif()
      

      The CACHE is mandatory, otherwise QtCreator won’t see the variable and it won’t use it

    • IDE support ANDROID_EXTRA_LIBS, you’ll need to add the next piece of CMake script to your CMakeLists.txt file
      if(ANDROID)
          if (ANDROID_ABI STREQUAL &quot;armeabi-v7a&quot;)
              set(ANDROID_EXTRA_LIBS ${CMAKE_CURRENT_SOURCE_DIR}/3rd-party/android_armeabi-v7a/ssl/libcrypto.so ${CMAKE_CURRENT_SOURCE_DIR}/3rd-party/android_armeabi-v7a/ssl/libssl.so CACHE INTERNAL &quot;&quot;)
          endif()
      endif()
      

      The previous snippet will add libcrypto.so and libssl.so files ONLY for armeabi-v7a android ABI.

    Note: KDAB offers training in CMake, including all the latest tips from our trainers, who are all active developers.

    The post QtCreator CMake for Android plugin appeared first on KDAB.

    Qt sensors just got better on Android

    $
    0
    0

    Each month KDAB schedules time for me to maintain the Qt for Android port. Usually I use it to review the pending patches or fix bugs, but sometime there is a quiet month and I have time to add new functionalities or improve the existing ones.

    April was quite quiet so I decided to rewrite the Android sensors plugin (no, this is not a late April fool’s joke).

    Why on earth did I want to do that? Why try to fix something that works? After all, the current implementation faithfully served us for years!

    I decided to rewrite it after I did some performance tests that showed some surprising numbers. When I used the NDK API to get sensors data, the CPU usage dropped from over 60% to even less than 20% (it fluctuates from 15% up to 30%)! Yup, that’s a surprising performance improvement, which TBH I hadn’t expected at all!

    I expected it to be faster, as the NDK API doesn’t need to move the data to JAVA and then back to C/C++ world (via JNI) but, I never dreamed it would be that fast!

    Are you wondering why we didn’t use the NDK API in the first place? It’s because the sensors NDK API was not introduced until API-16, which means that when we first implemented the sensors API, we were supporting Android from API-9. However, starting with Qt 5.9, the minimum API has been raised to API-16, so, now I can safely use NDK API for this job.

    Here you can find the pending patch. It targets dev branch which will be part of Qt 5.14.

    The post Qt sensors just got better on Android appeared first on KDAB.

    Viewing all 27 articles
    Browse latest View live


    Latest Images